Spanish bread are sweet bread rolls loved by many Filipinos. They are soft and fluffy, with a sweet, buttery filling. Many of us grew up eating them for merienda (afternoon snack) fresh from the bakery.
This Filipino Spanish bread recipe is easier than you think, and the results are totally worth it. With some basic ingredients and a little patience, you'll have a batch of warm, delicious bread ready to enjoy in no time.

Jump to:
What is Spanish bread?
Spanish bread is a soft and fluffy bread roll filled with a sweet, buttery mixture. The dough is made with yeast, shaped into a log, and coated with breadcrumbs before baking it until golden brown.
It's similar to Pandesal and is often enjoyed for breakfast or as a snack in the Philippines. It pairs perfectly with coffee or a cup of rich tablea hot chocolate.
Ingredients you'll need


Notes and substitutions
- Bread flour: This type of flour is high in protein, which gives the bread its chewy texture and stable structure. You can use all-purpose flour, but the bread won't be as chewy or stretchy.
- Active dry yeast: Yeast helps the dough rise. This kind needs to be dissolved in water with sugar to activate it. You can use the same amount of instant yeast instead and mix it directly into the dry ingredients since it doesn't need to be activated. Always check the expiration date to make sure it's still good.
- Condensed milk: It adds sweetness, flavor, and helps create a softer texture with a golden crust. If you don't have it, just skip it. Instead, replace the 1 cup of water in the recipe with 1 cup of regular milk (like whole or evaporated milk) and add 6 extra tablespoons of sugar.
- Breadcrumbs: I used fine, plain packaged breadcrumbs.
How to make this recipe
Note: For the best results, measure your ingredients carefully. If you have a kitchen scale, use it! If not, lightly spoon the flour into your measuring cup and level it off with a knife. Don't scoop straight from the bag, or you might end up with too much flour.
Step 1: Activate the yeast (only if using active dry yeast)
In a medium bowl, mix 2 teaspoons active dry yeast, 2 tablespoons sugar, and 1 cup warm water. Stir gently and let it sit for 5-10 minutes until it looks foamy. (Skip this step if you're using instant yeast.)
PRO TIP: Use warm water to wake up the yeast. Cold water won't work, and hot water can kill it. Test the water by dipping your finger in it-it should feel warm, but not too hot or uncomfortable (the ideal temperature is between 105°F and 115°F or 40°C to 46°C). You'll know the yeast is ready when you see a foamy layer on top.

Step 2: Dry ingredients
In a large mixing bowl or the bowl of your stand mixer, whisk together 3¼ cups bread flour and 1 teaspoon kosher salt (or about ½ teaspoon table salt).
If you're using instant yeast, add it right into the dry ingredients now.

Step 3: Wet ingredients
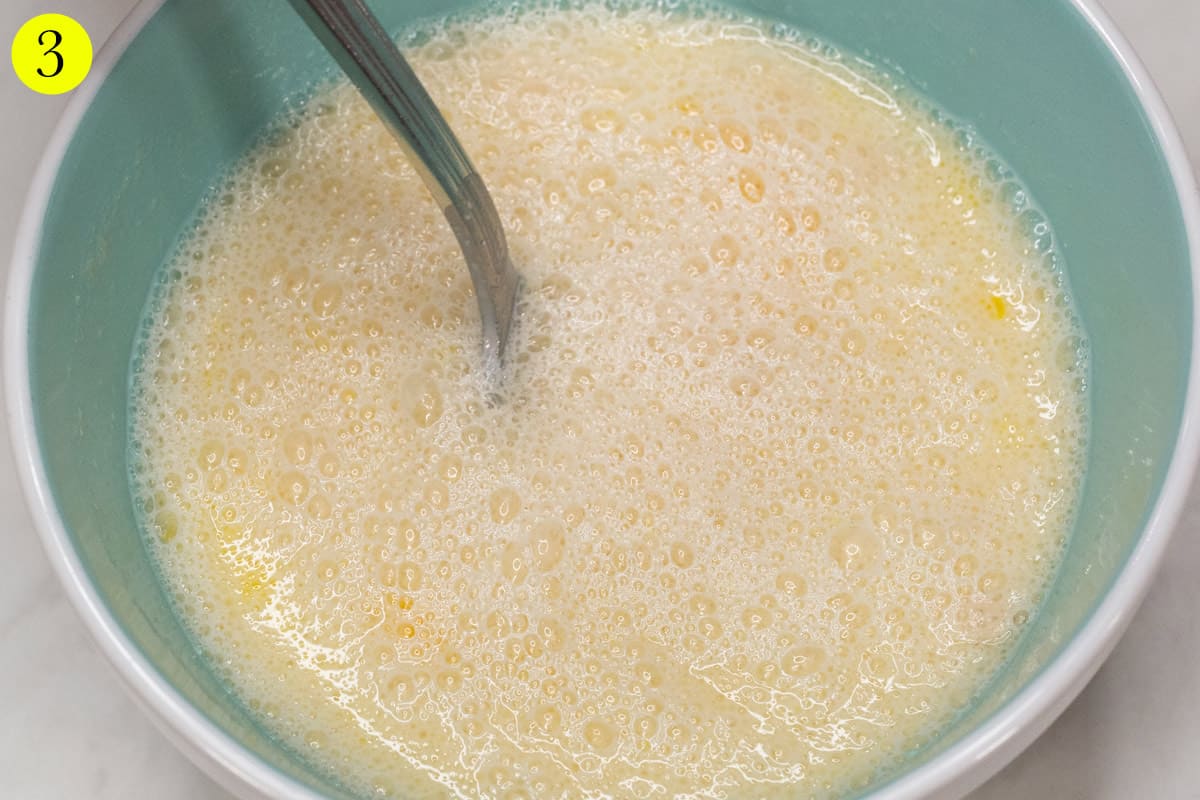
Into the bowl with the yeast mixture (from Step 1), add 1 egg, ½ cup condensed milk (substitution available), and 2 tablespoons neutral oil. Mix everything together until it's smooth.
If you're using instant yeast and skipped Step 1, don't forget to add 1 cup of warm water and 2 tablespoons of sugar to the wet ingredients here.
Step 4: Mix the dry and wet ingredients
Pour the wet ingredients into the flour mixture. Stir everything together until it forms a dough. The dough will be sticky at this point.

Step 5: Knead the dough
If you're using a stand mixer with the dough hook, knead the dough on medium speed for 12-15 minutes. At first, the dough will stick to the sides of the bowl, but keep mixing.
As it kneads, the dough will slowly start to pull away from the sides and form a smooth, stretchy ball. When it forms a ball on its own, it's ready. It should feel a little sticky, but not too much.

If you're kneading by hand, place the dough on a clean surface with a little bit of flour on it so it doesn't stick to the surface. Knead it for 20-25 minutes by pushing the dough away with the heel of your hand, then folding it back over itself.
After each fold, give the dough a little turn. Keep going until the dough is smooth and stretchy. If the dough is too sticky, sprinkle a little flour while you knead.

Step 6: The windowpane test (to check if dough is ready)
Take a small piece of dough and gently stretch it between your fingers. If it stretches without tearing and you can see light through it, the dough is ready and perfectly kneaded!
If the dough tears before you can stretch it, it means the gluten (which makes the dough stretchy and gives bread its chewy texture) hasn't developed enough, so it needs more kneading.
On the other hand, if it's tough and hard to stretch, it might be over-kneaded. In that case, cover it and let it rest for about 30 minutes to relax and become easier to work with.

Step 7: First rise (Proof the dough)
Form the dough into a ball and place it in a bowl lightly coated with oil so it doesn't stick. Cover with a clean kitchen towel or plastic wrap and place it in a warm place, away from cold air. Let it sit for 1 to 2 hours, or until it doubles in size.

Step 8: Prepare the filling
In a bowl, mix together 1 cup breadcrumbs, ½ cup softened butter, ¾ cup brown sugar, 1 teaspoon vanilla extract (optional), and a pinch of salt (if you're using unsalted butter). Stir everything until it's well combined.

Step 9: Divide the dough and add the filling
Gently press down on the risen dough to let out the extra air, but don't flatten it all the way. Cut the dough in half, then cut each half into 8 equal pieces using a knife or dough scraper.
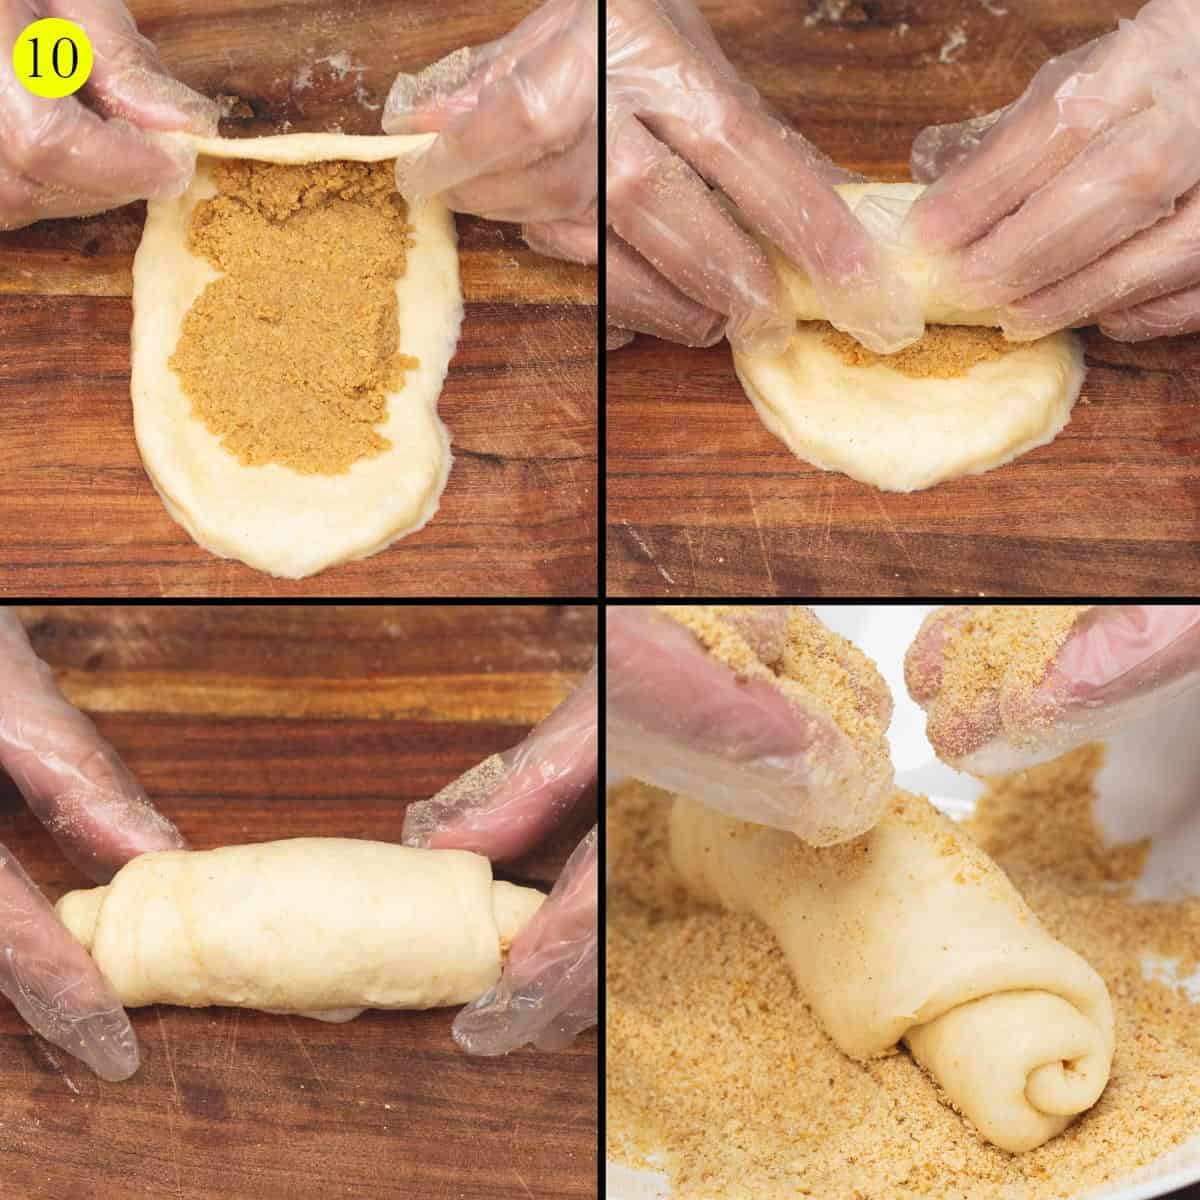
Use your hands or a rolling pin to flatten the dough into a rectangle or oval, about 6 inches by 3 inches. Spread 2 tablespoons of the sugar mixture evenly over the dough, leaving a little space around the edges.

Step 10: Shape the dough
Carefully roll the dough into a log shape, making sure the filling stays inside. Tuck the edge at the bottom to keep it from opening or puffing up while baking. Then, coat the log evenly with breadcrumbs.
Step 11: Second rise (Proof the dough)
Place the rolls on a baking sheet lined with parchment paper, leaving some space between each roll for the second rise. Cover them and let them rise until they look puffy, about 30 to 45 minutes.

Step 12: Bake
Preheat your oven to 400°F (205°C). Once the oven is heated, bake the rolls for 5 minutes. After that, lower the temperature to 350°F (175°C) and keep baking for 13-15 more minutes, or until the rolls are golden brown.
If you're not ready to bake right away, you can store the dough in the fridge or freezer. You can choose one of these options:
- Refrigerate before the first rise: Once the dough is properly kneaded (Step 6), cover it with plastic wrap and refrigerate for a few hours or overnight. When you're ready to bake, take it out and let it rise at room temperature until it doubles in size, then continue with the recipe.
- Refrigerate after shaping: After shaping the dough into rolls and coating them with breadcrumbs (Step 10), place them on a baking sheet. Cover with plastic wrap and refrigerate for a few hours or overnight. When ready to bake, take them out and let them rise at room temperature until they're puffy, then bake as usual.
- Freeze after shaping: Shape the dough into individual pieces without adding breadcrumbs (Step 10), place them on a tray to freeze until solid, then store them in a freezer bag. When you're ready to bake, coat with breadcrumbs, let them rise, and bake as usual.

Enjoy your freshly baked Spanish bread while it's warm - it's always best right out of the oven!
If you have leftovers, keep them in an airtight container at room temperature for up to 2 days, but make sure it's completely cooled before storing so it doesn't get soggy. If you want to keep it for longer, you can put it in the fridge for up to 1 week. You can also freeze the bread for up to 3 months-just make sure it's wrapped well to keep it fresh!

Recipe FAQs
Kneading the dough helps build gluten, which gives the bread its strength and stretchy texture. Gluten traps air bubbles from the yeast, helping the dough rise and making the bread soft and fluffy. If you don't knead the dough enough, the bread will turn out dense and flat.
The filling might leak out if you put too much inside or spread it all the way to the edges of the dough. To stop this, don't overfill the dough and leave a little space around the edges. Also, make sure to tuck the ends of the dough when you roll it up so it stays closed while baking.
To get a golden brown crust, make sure to coat the rolls well with breadcrumbs. Also, bake them at the right temperature and for the right amount of time.
To get a crispy crust, create steam in the oven when you start baking. You can spray the oven with water right after putting the bread in, or place a pan at the bottom of the oven and add boiling water to it. The steam helps make the crust crispy.
Other bread and pastries you may like


Did you make this recipe? I would love to know! Your feedback helps me make better recipes. Please rate, review, or comment below. Questions about this recipe are welcome, too!
Let's connect on Facebook, Instagram, Pinterest, TikTok, Twitter, and Youtube. Be sure to tag me when you try any of my recipes @recipesbynora!
📖 Recipe

Spanish Bread
Equipment
- Stand mixer with a dough hook attachment (optional)
- Baking Sheet
Ingredients
For the dough
- 2 teaspoons active dry yeast sub: instant yeast (see note)
- 2 tablespoons sugar
- 1 cup warm water
- 3¼ cups bread flour sub: all-purpose flour (see note)
- 1 teaspoon kosher salt sub: about ½ teaspoon table salt
- 1 egg at room temperature
- ½ cup condensed milk at room temperature (see note)
- 2 tablespoons neutral oil sub: melted butter
- ½ cup plain breadcrumbs (see note)
For the filling
- ½ cup salted or unsalted butter softened at room temperature
- ¾ cup brown sugar light or dark
- 1 cup plain breadcrumbs (see note)
- 1 teaspoon vanilla extract optional
- A pinch of salt (if using unsalted butter)
Instructions
- Activate the yeast (only if using active dry yeast): In a medium bowl, combine 2 teaspoons active dry yeast, 2 tablespoons sugar, and 1 cup warm water. Stir and let sit for 5-10 minutes until foamy. (Skip if using instant yeast.)
- Dry ingredients: In a large bowl or stand mixer, whisk together 3¼ cups bread flour and 1 teaspoon kosher salt (or ½ teaspoon table salt). If using instant yeast, add it now.
- Wet ingredients: Add 1 egg, ½ cup condensed milk, and 2 tablespoons neutral oil to the yeast mixture. Mix until smooth. If using instant yeast, add 1 cup warm water and 2 tablespoons sugar here.
- Mix dry and wet Ingredients: Pour the wet ingredients into the flour mixture. Stir until a sticky dough forms.
- Knead the dough: If using a stand mixer, knead on medium speed for 12-15 minutes. The dough will start sticky but will eventually form a smooth, stretchy ball. When it pulls away from the sides of the bowl, it's ready.If kneading by hand, place the dough on a floured surface and knead for 20-25 minutes until smooth and stretchy. Add a little flour if the dough gets too sticky.
- The windowpane test: Take a small piece of dough and gently stretch it. If it stretches without tearing and you can see light through it, the dough is ready.If it tears, knead the dough more. If it's tough and hard to stretch, it's over-kneaded. Let it rest for 30 minutes to relax and make shaping easier.
- First rise: Form the dough into a ball and place it in a bowl lightly coated with oil so it doesn't stick. Cover with a towel or plastic wrap and set it in a warm, draft-free spot. Let it rise for 1-2 hours, or until it doubles in size.
- Prepare the filling: In a bowl, mix 1 cup breadcrumbs, ½ cup softened butter, ¾ cup brown sugar, 1 teaspoon vanilla extract (optional), and a pinch of salt (if using unsalted butter). Stir until well combined.
- Divide the dough and add the filling: Gently press down on the risen dough to release air, then cut it in half and each half into 8 equal parts.Flatten each piece into a 6x3-inch rectangle or oval. Spread 2 tablespoons of the sweet filling evenly, leaving a small border around the edges.
- Shape the dough: Roll each piece of dough into a log, making sure the filling stays inside. Tuck the edge at the bottom to seal it. Coat the log evenly with breadcrumbs.
- Second rise: Place the rolls on a parchment-lined baking sheet, leaving space between each. Cover them and let them rise until they're puffy, about 30 to 45 minutes.
- Bake: Preheat your oven to 400°F (205°C). Once it's heated, bake the rolls for 5 minutes. Then, lower the temperature to 350°F (175°C) and bake for another 13-15 minutes, or until golden brown.
Notes
- Bread Flour: This flour makes the bread chewy and stretchy. You can use all-purpose flour, but there will be a slight difference.
- Active Dry Yeast: Yeast helps the dough rise. It needs to be dissolved in warm water with sugar to activate. You can use the same amount of instant yeast and mix it directly into the dry ingredients since it doesn't need activation. Check the expiration date to make sure it's still good.
- Condensed Milk: Adds sweetness and helps make the bread soft with a golden crust. If you don't have it, replace the 1 cup of water in the recipe with 1 cup of regular milk (like whole or evaporated milk) and add 6 extra tablespoons of sugar.
- Breadcrumbs: Use fine, plain breadcrumbs for coating.
- Refrigerate before the first rise: Once the dough is properly kneaded (Step 6), cover it with plastic wrap and refrigerate for a few hours or overnight. When ready to bake, let it rise at room temperature until doubled in size, then continue with the recipe.
- Refrigerate after shaping: Once shaped and coated with breadcrumbs (Step 10), cover the rolls with plastic wrap and refrigerate for a few hours or overnight. When ready to bake, let them rise at room temperature until puffy, then bake.
- Freeze after shaping: Shape the dough into individual pieces without adding breadcrumbs (Step 10), freeze on a tray until solid, then store in a freezer bag. When ready to bake, coat with breadcrumbs, let them rise, and bake as usual.
Dean says
My son said- “It’s the best Spanish bread i’ve had in my life. “ and i agree. Thanks for the recipe.
Nora Reyes says
Hi Dean! Aww, that is the best!! Thanks and I'm so happy he liked it. =)
Mara says
I have made it,i was so pleased for the results my family loved it so much.thank you for this recipe
Nora Reyes says
Hi Mara! So happy to hear that! Thank you for trying it out. =)