• Skip to primary navigation
  • Skip to main content
  • Skip to primary sidebar
Recipes by Nora
  • Recipe Index
  • About me
  • Contact
  • Subscribe
    • Email
    • Facebook
    • Instagram
    • Pinterest
    • TikTok
    • Twitter
    • YouTube
menu icon
go to homepage
  • Recipe Index
  • About me
  • Contact
  • Subscribe
    • Facebook
    • Instagram
    • Pinterest
  • subscribe
    search icon
    Homepage link
    • Recipe Index
    • About me
    • Contact
    • Subscribe
    • Facebook
    • Instagram
    • Pinterest
  • ×
    Home » Pork Recipes

    Air-Fried Pork Belly Recipe

    Published: Apr 7, 2023 by Nora Reyes · This post may contain affiliate links. If you make a purchase through links on our site, we may earn a commission. · 4 Comments

    116 shares
    • Facebook
    • Twitter
    • Email
    Jump to Recipe Print Recipe

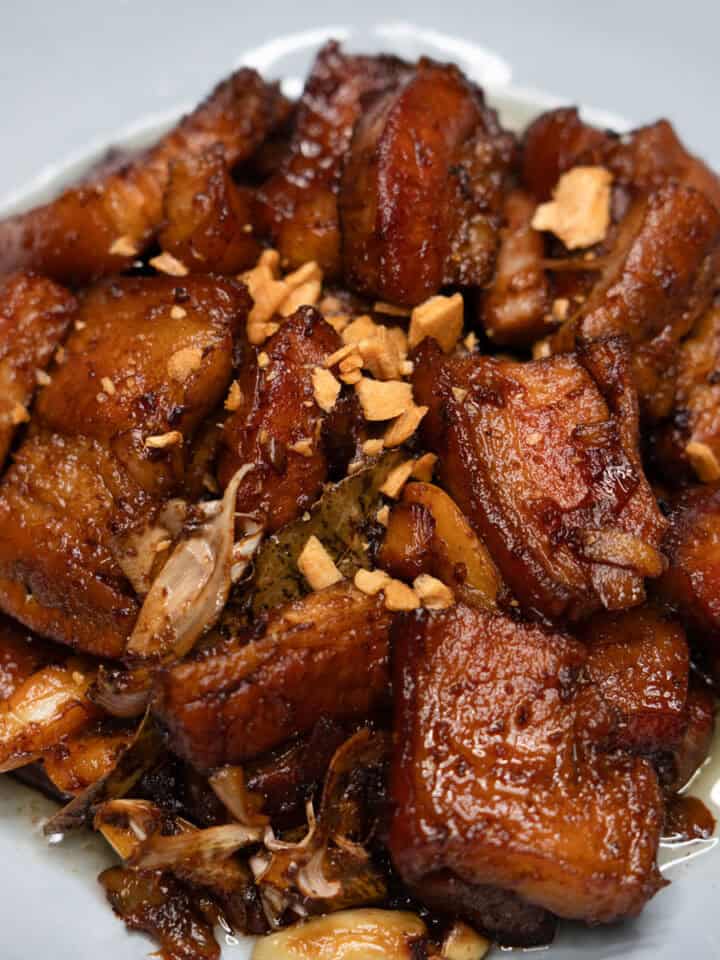
    Air-Fried Pork Belly is a healthier and more convenient alternative to deep-fried Lechon Kawali, producing the same crispy, crackling skin and juicy flesh.

    Air-fried pork belly on a cutting board.
    Jump to:
    • Ingredients you'll need
    • Notes and substitutions
    • How to make this recipe
    • Recipe FAQs
    • Filipino dishes to try in your air fryer
    • Other pork recipes you may like
    • 📖 Recipe
    • 💬 Comments

    Ingredients you'll need

    Slabs of pork belly on a cutting board.
    Pork Belly. Other ingredients not in the photo: garlic, bay leaves, salt, and pepper.

    Notes and substitutions

    • Pork belly: A boneless cut, sometimes with ribs attached, with thick layers of fat and meat. Choose skin-on pork belly with enough fat for the best flavor and texture. Pork shoulder, a cheaper and leaner cut with slightly tougher meat, is the closest substitute.
    • Dipping sauce: Serve with lechon sauce, a thick sauce that is sweet and tangy made with pork liver. You can also use Mang Tomas all-purpose sauce or a spicy vinegar dipping sauce.

    How to make this recipe

    Step 1: Place the entire slab of pork belly skin side up in a large pot. You can cut it to fit in the pot, but not too small so it won't dry out.

    Add 3 smashed garlic, 2 bay leaves, 1 tablespoon kosher salt (use less for table salt), and some ground black pepper or peppercorns.

    Completely submerge the meat in water. Bring it to a boil over medium-high heat, then lower the heat and simmer until fork tender.

    Depending on the thickness of the meat, tenderizing may take 1½ to 2 hours on the stove. Alternatively, a pressure cooker can do it for 30 to 45 minutes. If it comes with some bones, remove them before frying for easier cutting.

    PRO TIP: For crispy, crunchy skin that won't break your teeth, it's crucial to boil the meat until the skin becomes very tender and almost gelatinous. When you've achieved that, you are halfway there.

    Adding water to pork belly and other ingredients in the Dutch oven.

    Step 2: Transfer to a plate with the skin side up, then salt the skin to help draw out the moisture. Let it dry uncovered overnight in the fridge.

    If you need it sooner, place it in the oven at 250° F (121° C) for about an hour to dry the skin. You can also freeze them and fry them later.

    Boiled pork belly slab on a container.

    Step 3: Slice into 3-inch thick pieces to get plenty of crispy exterior while keeping the inside juicy. As an option, you can score the skin to expose more fat for crispier skin. Sprinkle salt all over the meat, except for the skin, which has already been salted.

    Slicing the pork belly slab on a cutting board.

    Step 4: Place the pork belly skin side up in the air fryer basket. Do not overcrowd, leaving enough space between them to allow air to circulate and promote even cooking.

    Pork belly pieces in the air fryer basket.

    Step 5: Air-fry it at 400° F (204° C) for 20-30 minutes, depending on the size or thickness. Check it periodically to ensure that it turns golden brown and the skin becomes crispy.

    Holding the air fried pork belly with a pair of tongs over the air fryer basket.

    Step 6: Let it cool for 5-10 minutes, then cut it into bite-sized pieces.

    Cut up air fried pork belly into small pieces.

    Lechon Kawali is best served with a lechon sauce or spiced vinegar dipping sauce. Double the recipe or save the leftovers for Pork Belly Sisig or Pinakbet.

    Dipping a piece of air fried pork belly in lechon sauce.

    Recipe FAQs

    What are the advantages of air frying lechon kawali?

    Air frying lechon kawali is a healthier cooking method that uses little to no oil. It is also less messy and more convenient than deep-frying. With air frying, you can achieve consistent and crispy results that are similar to deep frying, but without the greasiness.

    Can you air fry frozen lechon kawali?

    Yes. Though it may take longer, you can air fry lechon kawali straight from the freezer. Use a lower temperature of 375° F (190° C) to ensure it cooks evenly on the inside and the outside turns golden brown. You will also need to give it extra time in the air fryer.

    Filipino dishes to try in your air fryer

    • Lumpiang Shanghai: Meat-filled lumpia wrapped in thin, crispy wrappers.
    • Dynamite Lumpia: Stuffed green chili peppers wrapped in lumpia wrappers.
    • Lumpiang Gulay: Spring rolls filled with sautéed vegetables and dipped in vinegar.
    • Turon: Sweet saba banana rolls, with variations like Ube Turon or those filled with langka (jackfruit).
    • Empanadas: Filipino-style pastry pockets with savory fillings.
    • Inihaw na Liempo: While traditionally grilled, the air fryer is an alternative method for these marinated pork belly slices.
    • Pork BBQ Skewers: Typically grilled over charcoal, using an air fryer can provide these marinated skewers a comparable texture.
    • Fried Chicken: Marinated pieces of chicken fried until crispy and golden brown, while the inside remains moist and tender.
    • Fried Fish: Whether frying a whole fish or preparing bangus for a silog breakfast or Bangus Sisig, use the air fryer and avoid the excess oil.

    Other pork recipes you may like

    • Igado in a bowl.
      Igado (Pork and Liver Stew)
    • Lechon Paksiw on a plate.
      Lechon Paksiw Recipe
    • Humba in a bowl.
      Humba Recipe
    • Dinuguan in a bowl.
      Dinuguan Recipe

    Did you make this recipe? I would love to know! Your feedback helps me make better recipes.  Please rate, review, or comment below. Questions about this recipe are welcome, too!

    Let's connect on Facebook, Instagram, Pinterest, TikTok, Twitter, and Youtube. Be sure to tag me when you try any of my recipes @recipesbynora!

    📖 Recipe

    Air Fried Pork Belly on a chopping board.

    Air Fried Pork Belly

    Air frying pork belly produces the same crispy, crackling skin and juicy flesh as deep-frying.
    5 from 3 votes
    Print Pin Rate
    Course: Main Course, Snack
    Cuisine: Filipino
    Diet: Gluten Free
    Prep Time: 5 minutes minutes
    Cook Time: 2 hours hours
    Refrigerate: 12 hours hours
    Total Time: 14 hours hours 5 minutes minutes
    Servings: 10
    Calories: 706kcal
    Author: Nora Rey
    Cost: $9-$12

    Equipment

    • Large pot (for boiling)
    • Tongs
    • Air Fryer

    Ingredients

    • 1 pork belly slab (about 3 pounds), skin on (see note)
    • 3 garlic cloves smashed
    • 2 bay leaves
    • Salt
    • Ground black pepper or peppercorns
    • Dipping sauce (see note)

    Instructions

    • Place the entire slab of pork belly skin side up in a large pot. You can cut it to fit in the pot, but not too small so it won't dry out.
    • Add garlic, bay leaves, 1 tablespoon kosher salt (use less for table salt), and some ground black pepper or peppercorns. Completely submerge the meat in water.
    • Bring it to a boil over medium-high heat, then lower the heat and simmer until fork tender.
      Depending on the thickness, it may take 1½ to 2 hours on the stove or 30 to 45 minutes in a pressure cooker. If your pork belly comes with some bones, remove them before frying for easier cutting.
      PRO TIP: For crispy, crunchy skin that won't break your teeth, it's crucial to boil the meat until the skin becomes very tender and almost gelatinous. When you've achieved that, you are halfway there.
    • Transfer to a plate with the skin side up, then salt the skin to help draw out the moisture. Let it dry uncovered overnight in the fridge.
      If you need it sooner, place it in the oven at 250° F (121° C) for about an hour to dry the skin. You can also freeze them and fry them later.
    • Slice into 3-inch thick pieces to get plenty of crispy exterior while the inside stays juicy. As an option, you can score the skin to expose more fat for crispier skin.
    • Sprinkle salt all over the meat, except for the skin, which has already been salted.
    • Place the pork belly in the air fryer basket with the skin side up. Do not overcrowd, leaving enough space between them to allow air to circulate and promote even cooking.
    • Air-fry it at 400° F (204° C)for 20-30 minutes, depending on the size or thickness. Check it periodically to ensure that it turns golden brown and the skin becomes crispy.
    • Let it cool for 5-10 minutes, then cut it into bite-size pieces.

    Notes

    • Pork belly: A boneless cut, sometimes with ribs attached, with thick layers of fat and meat. Choose skin-on pork belly with enough fat for the best flavor and texture. Pork shoulder, a cheaper and leaner cut with slightly tougher meat, is the closest substitute.
    • Dipping sauce: Serve with lechon sauce, a thick sauce that is sweet and tangy made with pork liver. You can also use Mang Tomas all-purpose sauce or a spicy vinegar dipping sauce.

    Nutrition

    Calories: 706kcalCarbohydrates: 0.3gProtein: 13gFat: 72gSaturated Fat: 26gPolyunsaturated Fat: 8gMonounsaturated Fat: 34gCholesterol: 98mgSodium: 67mgPotassium: 255mgFiber: 0.02gSugar: 0.01gVitamin A: 15IUVitamin C: 1mgCalcium: 9mgIron: 1mg
    Disclaimer: The nutritional information provided here is solely for informational purposes. I am not a certified nutritionist, and this data hasn't been evaluated by the Food and Drug Administration or any other authority. It shouldn't be seen as health or nutrition advice. The figures are estimates calculated from various food composition databases and might vary based on product types, brands, natural variations in produce, and ingredient processing methods. Individual results may differ.
    Tried this Recipe? Pin it for Later!Mention @recipesbynora or tag #RecipesByNora!

    More Filipino & Asian Pork Recipes

    • Pork and mushroom stir fry on a plate.
      Pork and Mushroom Stir Fry Recipe
    • Pineapple glazed ham
      Pineapple-Glazed Ham (Stovetop Recipe)
    • Tokwat baboy in a bowl.
      Tokwa't Baboy Recipe
    • Sinigang na baboy in a bowl.
      Sinigang na Baboy Recipe
    116 shares
    • Facebook
    • Twitter
    • Email

    About the author

    Hi, I'm Nora! 

    Whether you're new to Filipino food or have loved it for so long, I sure am happy you're here!  I hope you'll find useful recipes that you can enjoy and share with family and friends.

    Learn more about me →

    Reader Interactions

    Comments

    1. Liza

      October 03, 2023 at 11:58 pm

      5 stars
      Thank you for the recipe! It turned out really good on my first try. Happy tummy, happy hubby! 😊

      I’ll try freezing next time. Do I need to refrigerate overnight before freezing?
      Then do I thaw overnight in the fridge before air frying?

      Reply
      • Nora Rey

        October 05, 2023 at 12:13 am

        Hello Liza!
        First off, thank you for reaching out! I'm so glad to hear that the recipe was a success on your first try - that's fantastic! 😊
        Now, about freezing: After boiling the meat, I typically salt the skin and let it sit on the countertop to cool and dry (maybe for an hour). There's no need to refrigerate it. Before popping it into the freezer, wipe off any moisture on the skin so it stays crispy when you air-fry, then wrap it up and pop it in the freezer.
        When it comes to frying, thawing overnight in the fridge is ideal so the meat can cook evenly. But if you're short on time, you can air fry it straight from the freezer. Just be sure to lower the temperature and give it some extra time so the inside cooks at the same time as the outside.
        Also consider cutting the meat into smaller pieces before freezing⁠—it cooks faster and more evenly. Hope this helps. Can't wait for you to try your next batch! 💛🍴

        Reply
    2. Maria

      May 04, 2023 at 1:51 am

      5 stars
      I just love lechon kawali! I gotta try it in an air fryer!

      Reply
      • Nora Rey

        July 23, 2023 at 3:16 am

        Absolutely! Lechon kawali in an air fryer is a game-changer. It gets that perfect crispy skin without the excess oil. You'll definitely enjoy it! Give it a try and let me know how it turns out.

        Reply
    5 from 3 votes (1 rating without comment)

    Thanks for coming! Let me know what you think: Cancel reply

    Your email address will not be published. Required fields are marked *

    Recipe Rating


    Primary Sidebar

    Hi, I'm Nora! Whether you're new to Filipino food or have loved it for so long, I sure am happy you're here!  I hope you'll find useful recipes that you can enjoy and share with family and friends.

    More about me →

    Popular Recipes

    • Grilled Pork Belly on a plate with pickled vegetables and spicy vinegar dipping sauce.
      Inihaw na Liempo Recipe
    • Beef stir fry with onions and peppers in a wok zoomed in.
      Beef Stir Fry with Onions & Peppers
    • Mackerel on Olive oil on a plate.
      Mackerel in Olive Oil
    • Beef Caldereta topped on a rice served on a plate.
      Beef Caldereta Recipe
    • Buko Pandan on a glass dish cup topped with ice cream covered be rice crisps.
      Buko Pandan Salad Recipe
    • Assorted Filipino foods on a table covered in banana leaf for a Kamayan Feast.
      Kamayan Feast: Bringing Family and Friends Together

    Seasonal Desserts

    You must use the category name, not a URL, in the category field.

    Footer

    ↑ back to top

    About

    • Accessibility Statement
    • Cookie Policy
    • Disclaimer
    • Image Use & Copyright
    • Privacy Policy

    Contact

    • Contact

    Copyright © 2023 RECIPES BY NORA

    We use cookies on our website to give you the most relevant experience by remembering your preferences and repeat visits. By clicking “Accept”, you consent to the use of ALL the cookies.
    Do not sell my personal information.
    Cookie SettingsAccept
    Manage consent

    Privacy Overview

    This website uses cookies to improve your experience while you navigate through the website. Out of these, the cookies that are categorized as necessary are stored on your browser as they are essential for the working of basic functionalities of the website. We also use third-party cookies that help us analyze and understand how you use this website. These cookies will be stored in your browser only with your consent. You also have the option to opt-out of these cookies. But opting out of some of these cookies may affect your browsing experience.
    Necessary
    Always Enabled
    Necessary cookies are absolutely essential for the website to function properly. These cookies ensure basic functionalities and security features of the website, anonymously.
    CookieDurationDescription
    cookielawinfo-checkbox-analytics11 monthsThis cookie is set by GDPR Cookie Consent plugin. The cookie is used to store the user consent for the cookies in the category "Analytics".
    cookielawinfo-checkbox-functional11 monthsThe cookie is set by GDPR cookie consent to record the user consent for the cookies in the category "Functional".
    cookielawinfo-checkbox-necessary11 monthsThis cookie is set by GDPR Cookie Consent plugin. The cookies is used to store the user consent for the cookies in the category "Necessary".
    cookielawinfo-checkbox-others11 monthsThis cookie is set by GDPR Cookie Consent plugin. The cookie is used to store the user consent for the cookies in the category "Other.
    cookielawinfo-checkbox-performance11 monthsThis cookie is set by GDPR Cookie Consent plugin. The cookie is used to store the user consent for the cookies in the category "Performance".
    viewed_cookie_policy11 monthsThe cookie is set by the GDPR Cookie Consent plugin and is used to store whether or not user has consented to the use of cookies. It does not store any personal data.
    Functional
    Functional cookies help to perform certain functionalities like sharing the content of the website on social media platforms, collect feedbacks, and other third-party features.
    Performance
    Performance cookies are used to understand and analyze the key performance indexes of the website which helps in delivering a better user experience for the visitors.
    Analytics
    Analytical cookies are used to understand how visitors interact with the website. These cookies help provide information on metrics the number of visitors, bounce rate, traffic source, etc.
    Advertisement
    Advertisement cookies are used to provide visitors with relevant ads and marketing campaigns. These cookies track visitors across websites and collect information to provide customized ads.
    Others
    Other uncategorized cookies are those that are being analyzed and have not been classified into a category as yet.
    SAVE & ACCEPT
    116 shares

    Rate This Recipe

    Your vote:


    A rating is required
    A name is required
    An email is required

    Recipe Ratings without Comment

    Something went wrong. Please try again.