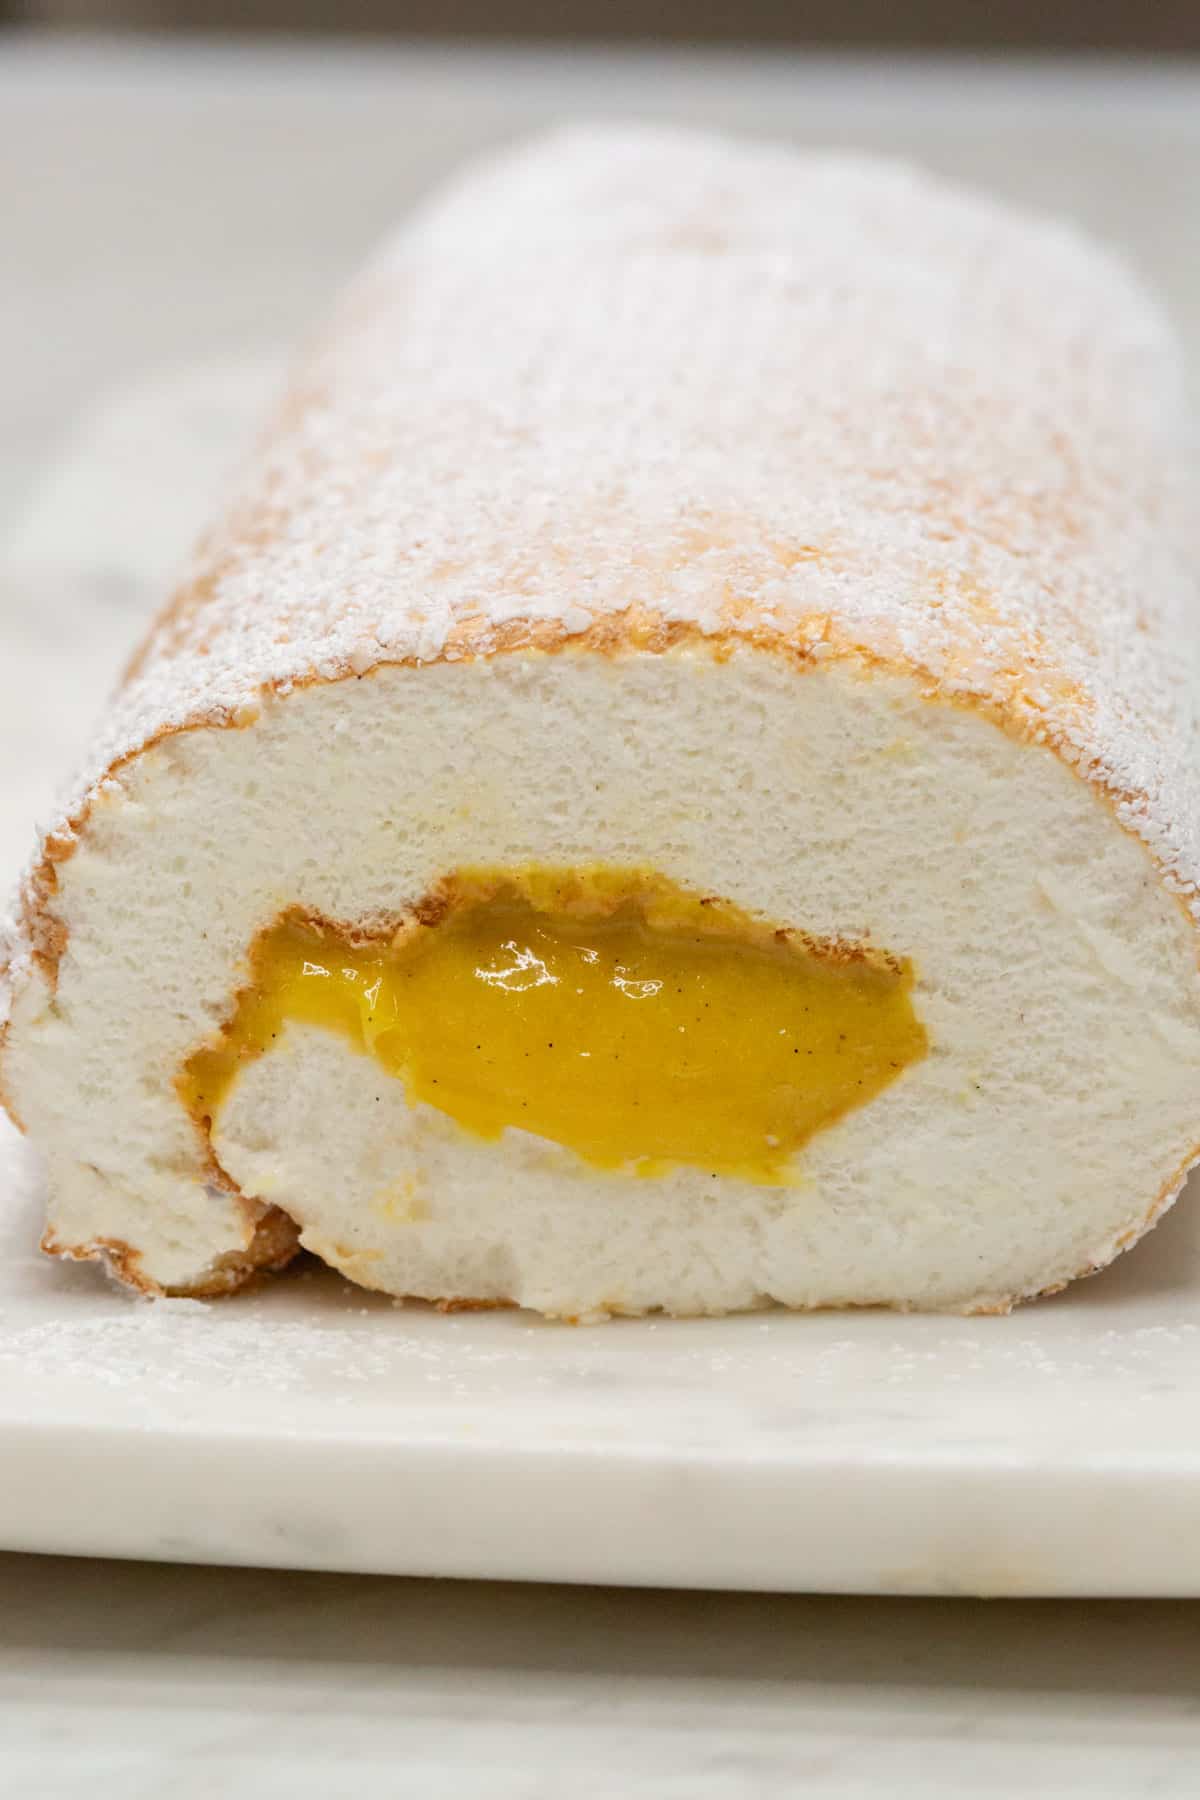
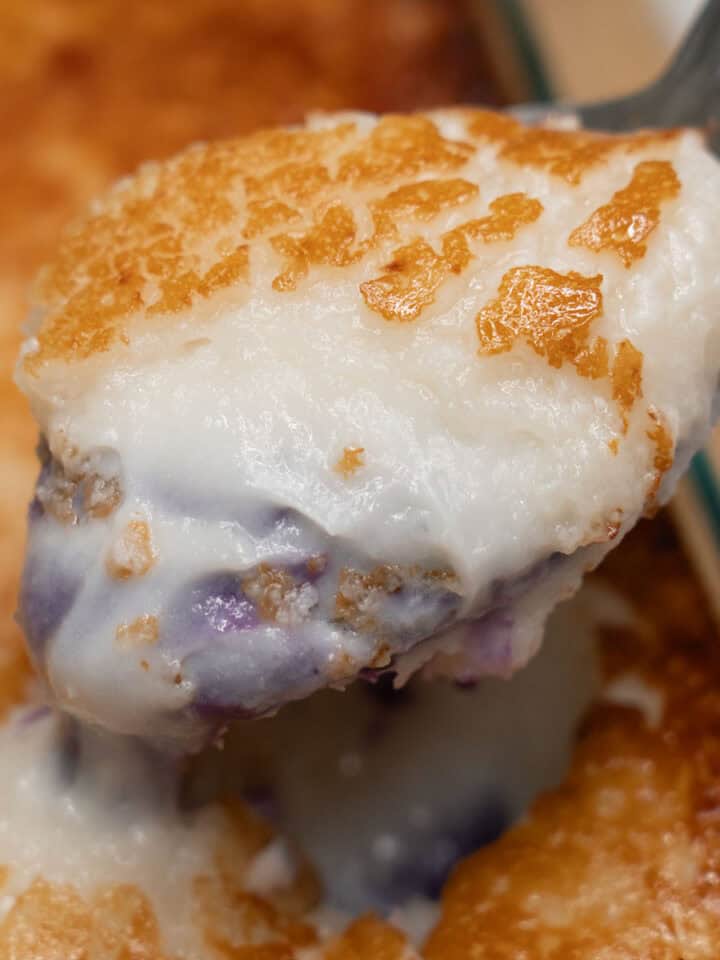
Brazo de Mercedes is a Filipino dessert made with soft meringue rolled into a log and filled with rich custard.
It looks fancy, but it's simpler than you might think.
If you like desserts that are light, creamy, and not too heavy, this is a good one to make.
Jump to:
What is Brazo de Mercedes?
Brazo de Mercedes is a Filipino dessert made with a soft meringue roll and a thick custard filling made from egg yolks and condensed milk.
The meringue is lightly toasted on the outside, then rolled into a log. Its name means "Arm of Mercy" in Spanish.
You'll also find versions with ube or pandan filling, and even frozen ones.
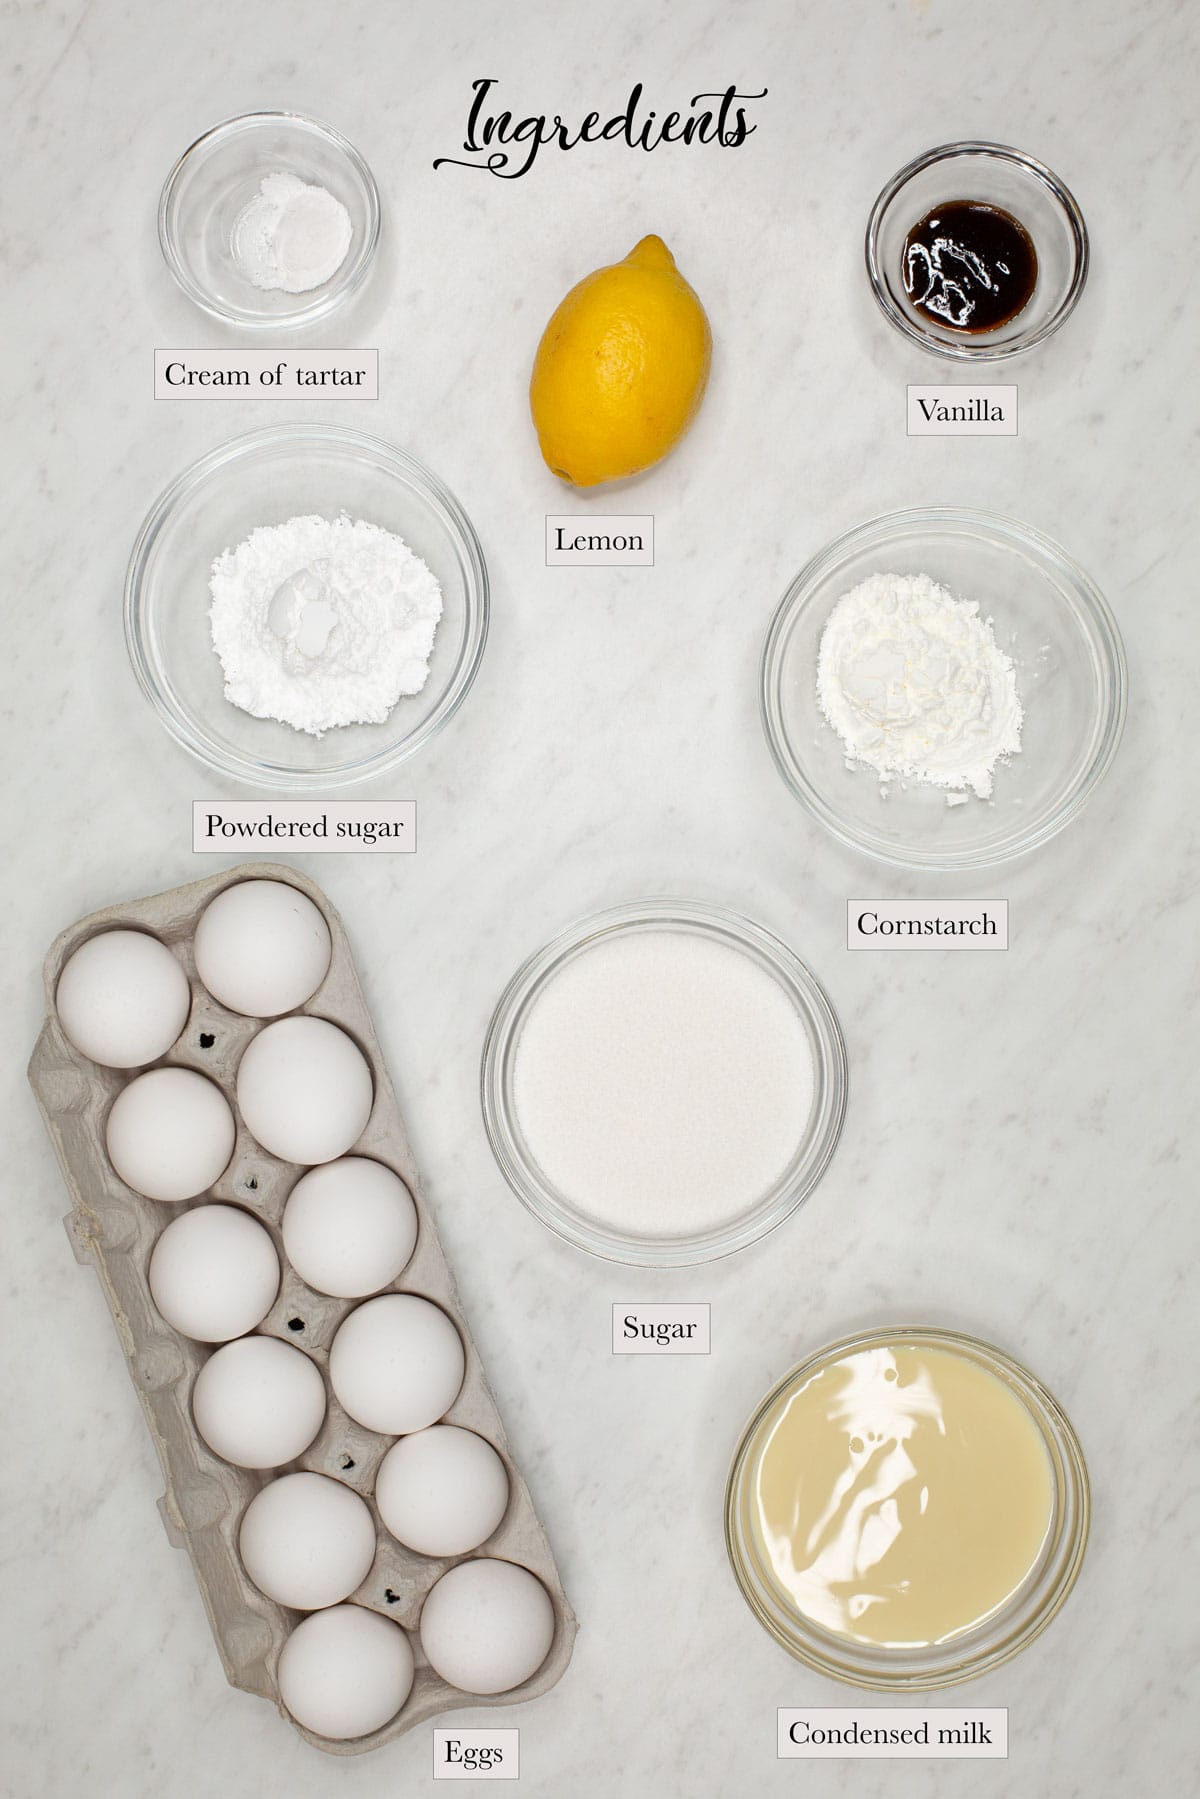
Ingredients You'll Need
Notes and Substitutions
- Eggs: Egg whites whip better at room temperature and give you more volume. But eggs are easier to separate when cold, so it helps to separate them first, then let the whites sit out for a bit before whipping.
- Cream of tartar: This helps keep the meringue stable, so it holds its shape better. If you do not have any, you can use about 1 teaspoon of lemon juice or white vinegar instead.
- Cornstarch: A little cornstarch helps keep the meringue from weeping. It also helps thicken the custard so it is smooth and spreadable, not too runny.
- Butter: This makes the custard smoother and gives it a little more flavor. You can leave it out if you want.
How to Make Brazo de Mercedes (Step-by-Step)
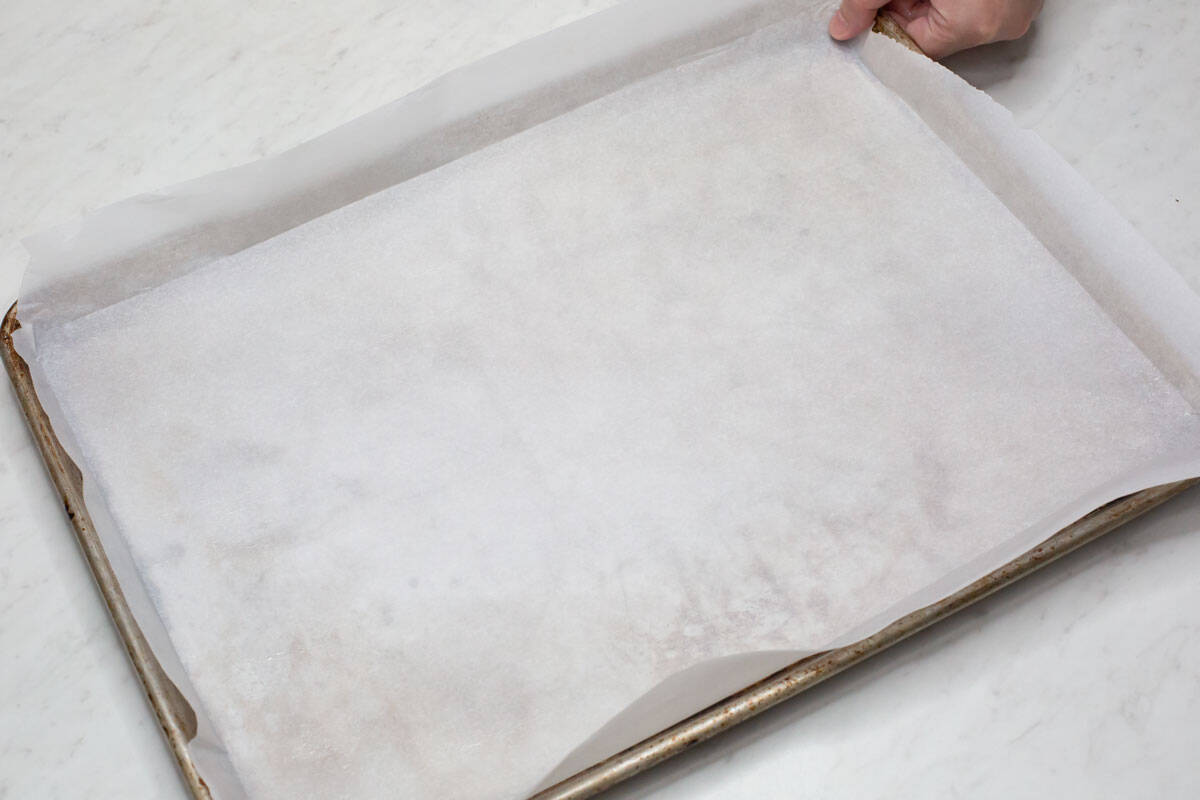
Step 1: Preheat oven and prep the pan
Preheat the oven to 350°F (175°C).
Line a half sheet pan (18x13 inches) or jelly roll pan (15x10 inches) with parchment paper, leaving some overhang on the sides so it is easier to lift later.
Lightly grease the parchment with baking spray to help keep the meringue from sticking. Set aside.
Step 2: Separate the eggs
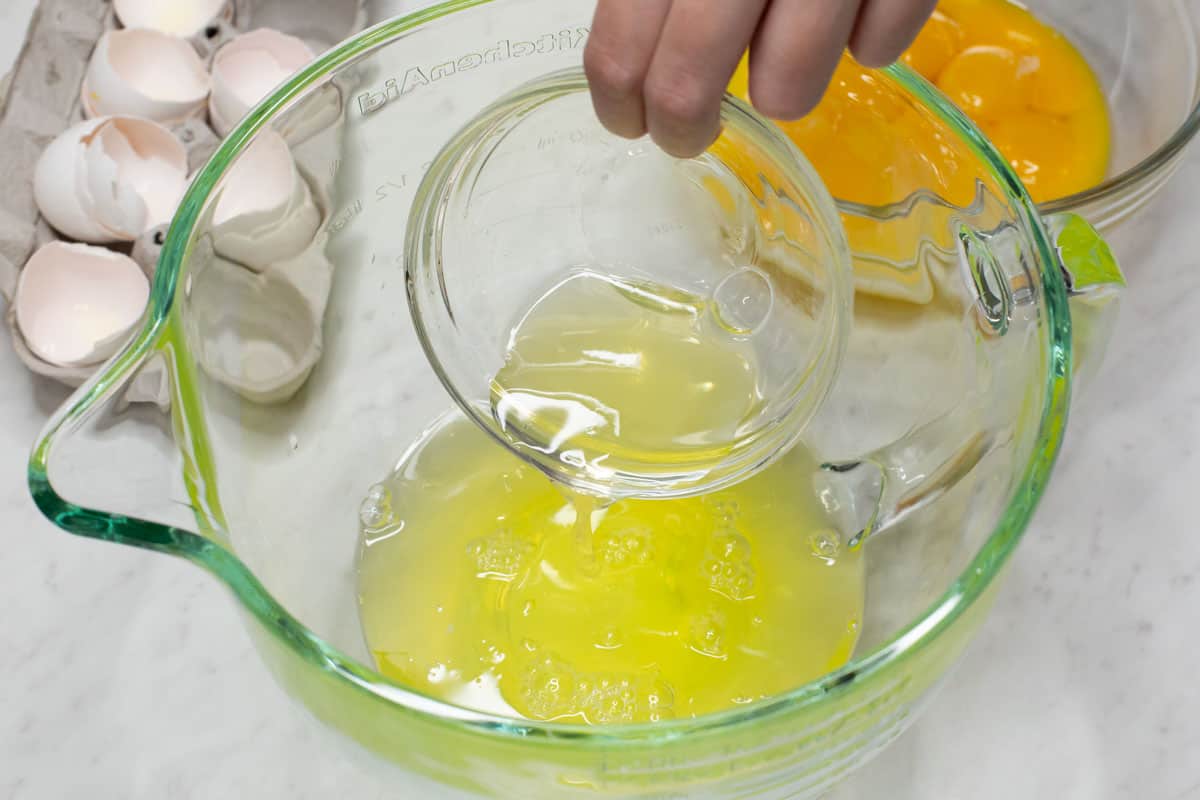
Carefully separate 12 eggs.
Place the whites in a large, clean mixing bowl for the meringue. Make sure there is no yolk, oil, or water in the egg whites, or they may not whip properly.
Place the yolks in a medium heatproof bowl for the custard.
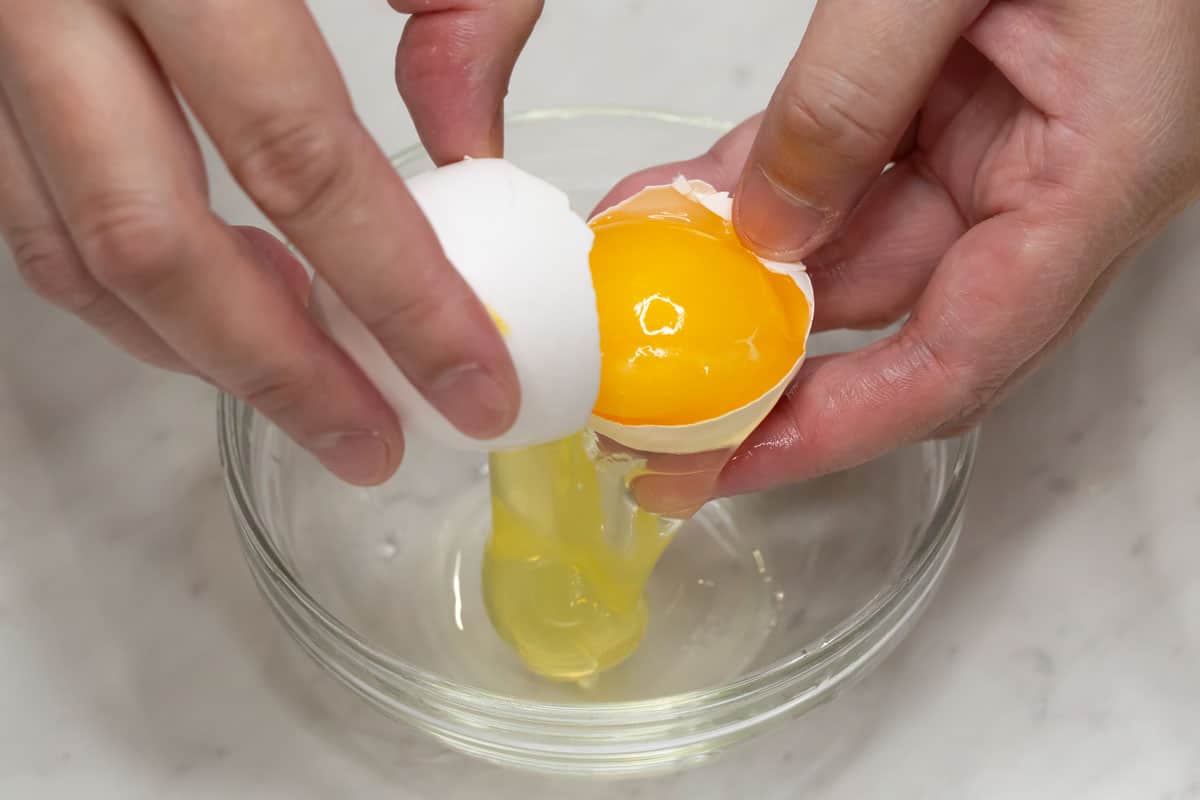
It helps to use three bowls. Crack and separate each egg over a small bowl first.
If the white is clean, pour it into the large mixing bowl and add the yolk to the heatproof bowl.
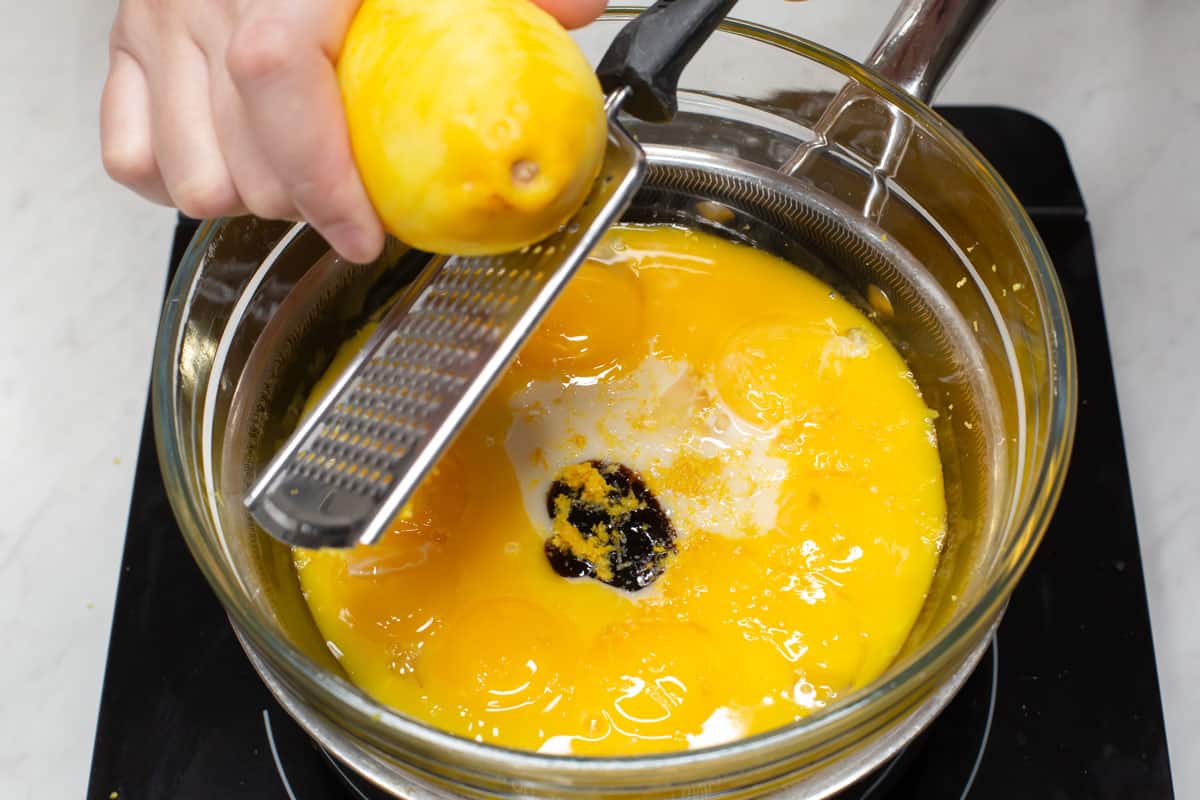
Step 3: Make the custard filling (yema)
In a heatproof bowl, combine:
- 12 egg yolks
- 1 cup condensed milk
- 2 tablespoons cornstarch
- 1 teaspoon vanilla extract
- a pinch of salt
- zest of 1 lemon
- 1 tablespoon lemon juice
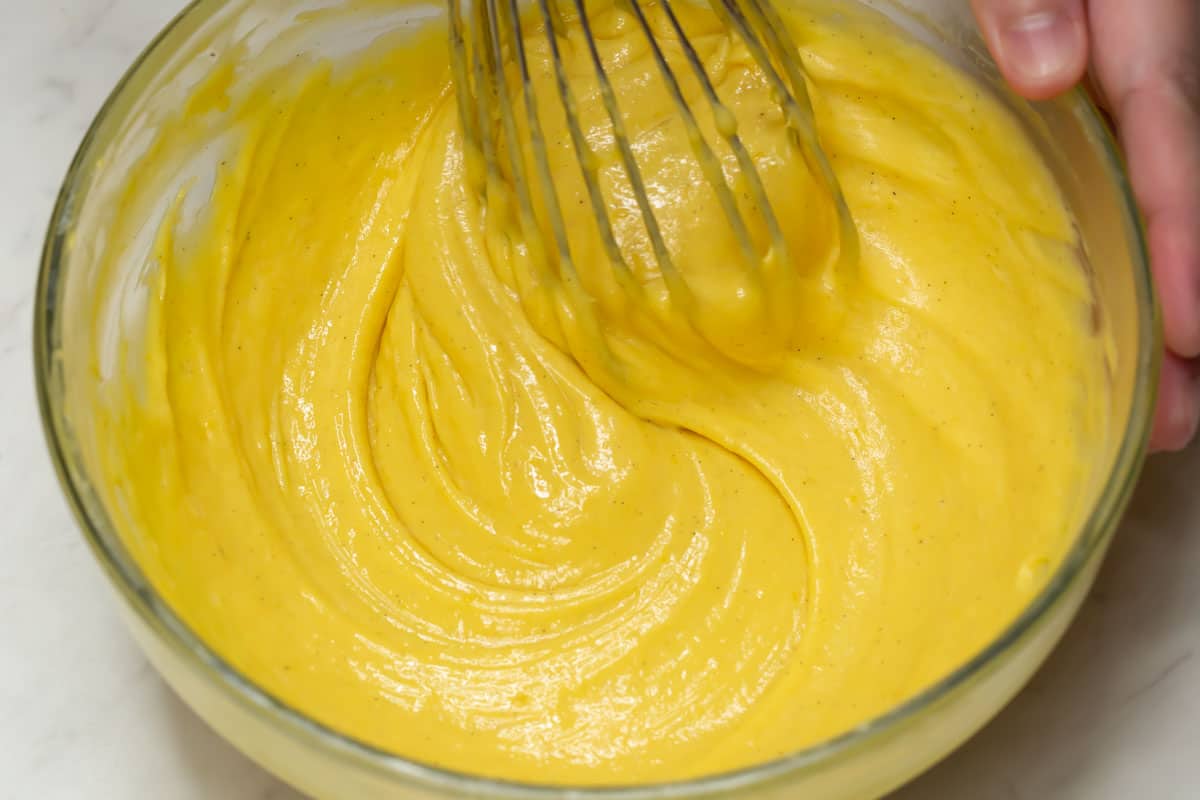
Whisk until smooth, then set the bowl over a pot of simmering water.
You can also use a heavy-bottomed pot if you want to cook it faster. Just keep the heat low and stir constantly so the custard does not curdle.
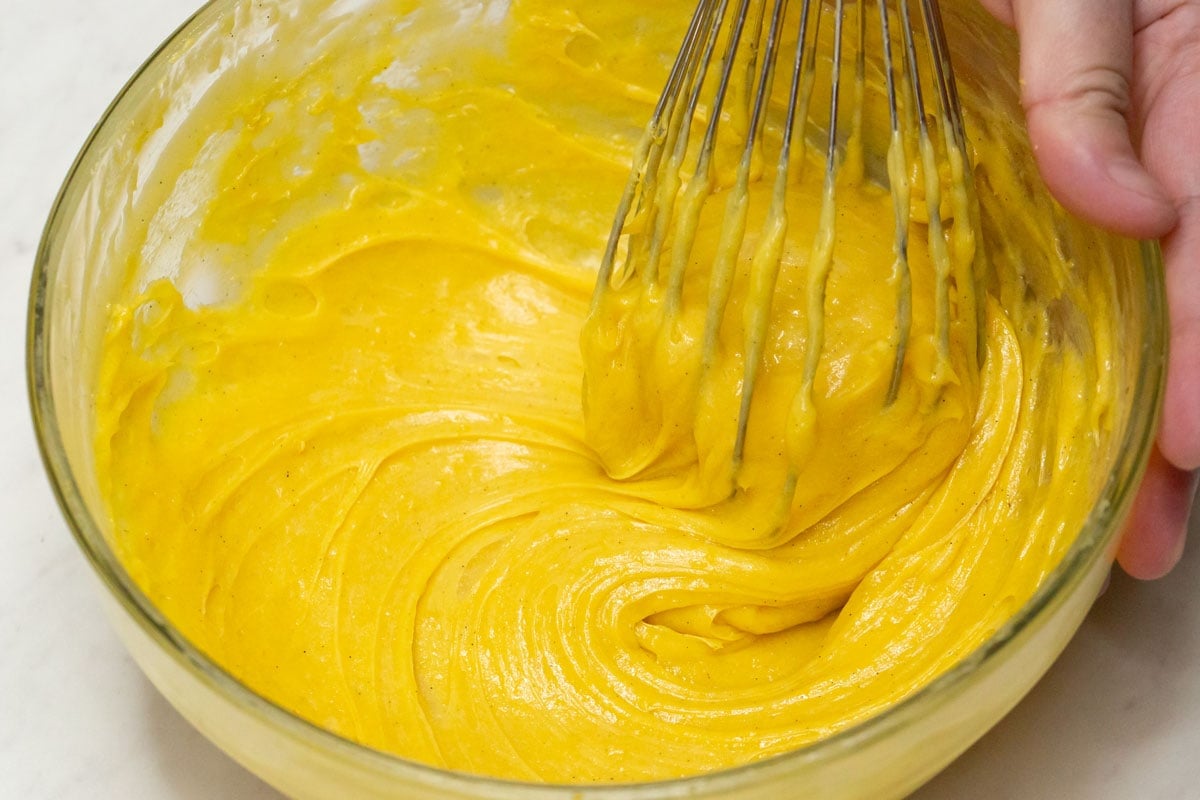
Stir now and then so the custard stays smooth and doesn't curdle. After about 30 minutes, it should thicken.
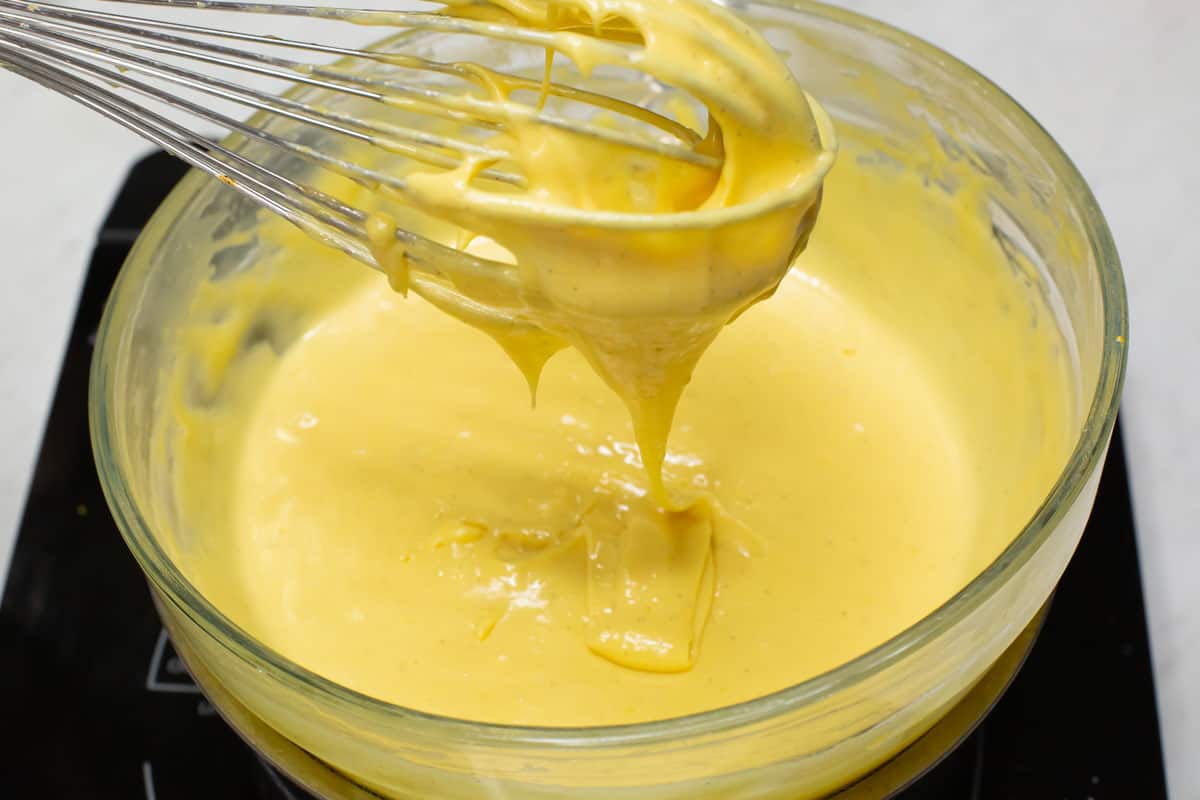
You'll know it's ready when you lift the whisk and the custard falls slowly in a thick ribbon. It will thicken more as it cools.
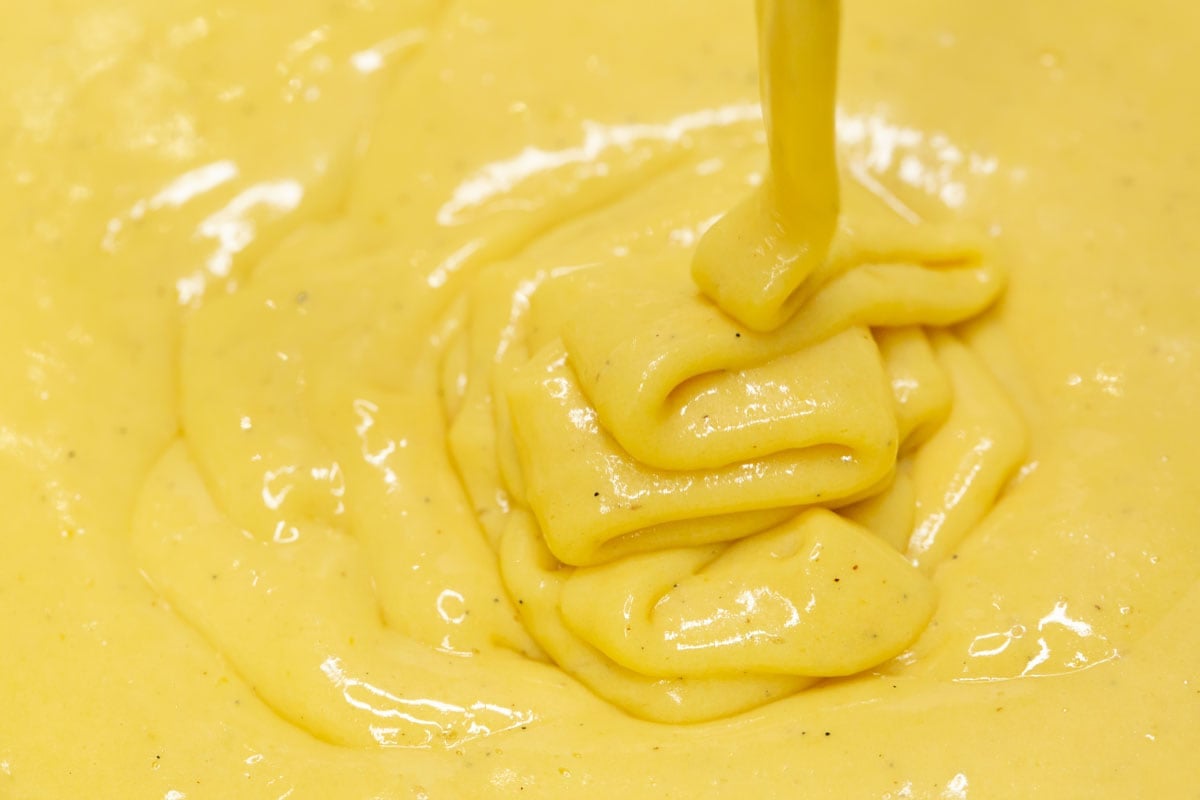
Turn off the heat, then stir in 2 tablespoons butter until melted. The custard should look smooth and glossy.
Set it aside to cool while you make the meringue.
Step 4: Make the meringue
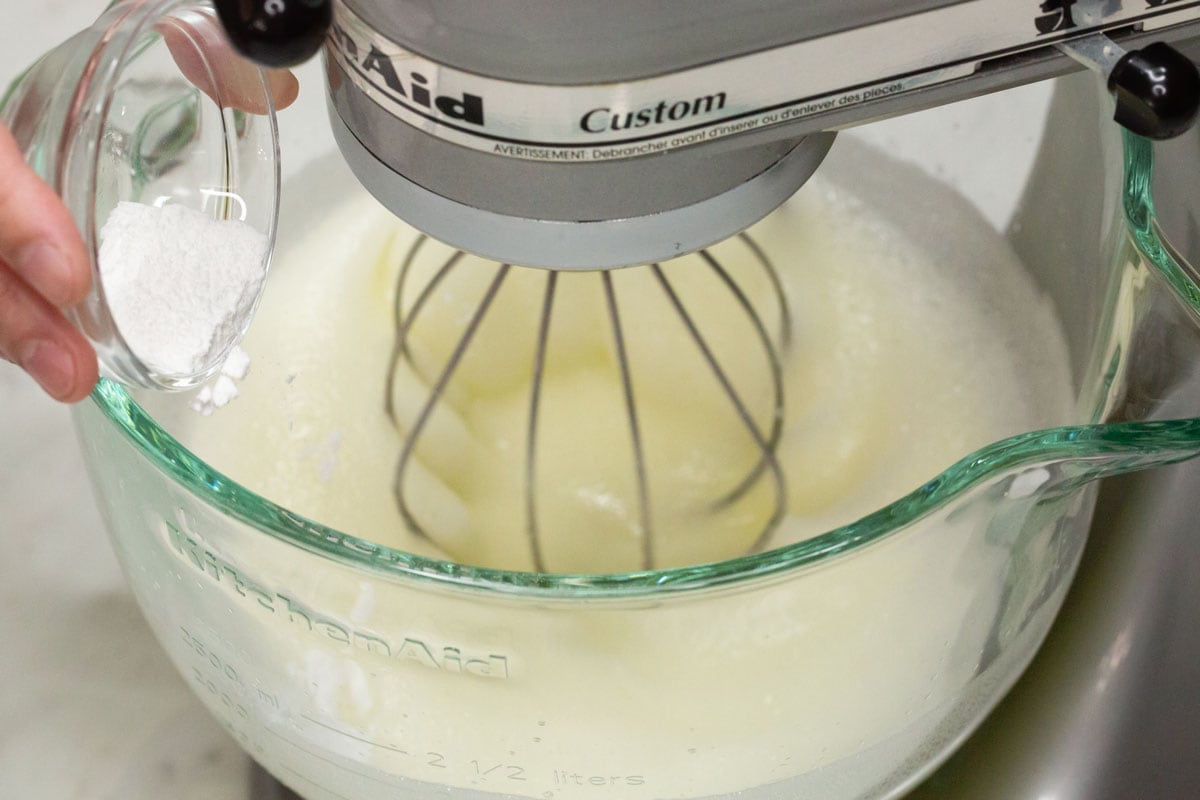
Start beating 12 egg whites on medium-low speed to build small, stable bubbles.
Once they look foamy, add 1 teaspoon of cream of tartar to stabilize the meringue.
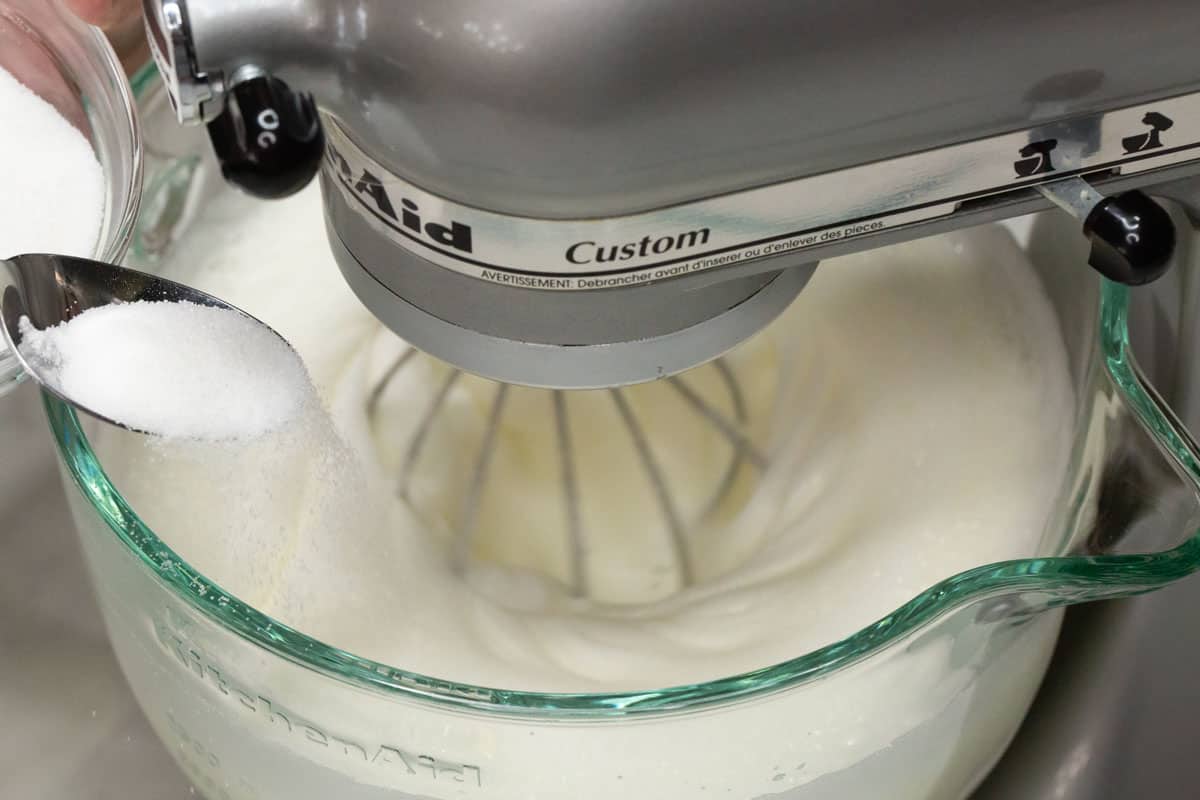
Increase the speed to medium-high and slowly add ¾ cup of sugar.
Adding it a little at a time helps it dissolve better and keeps the meringue from deflating.
Then, add 1 teaspoon of vanilla extract and 2 tablespoons of cornstarch.
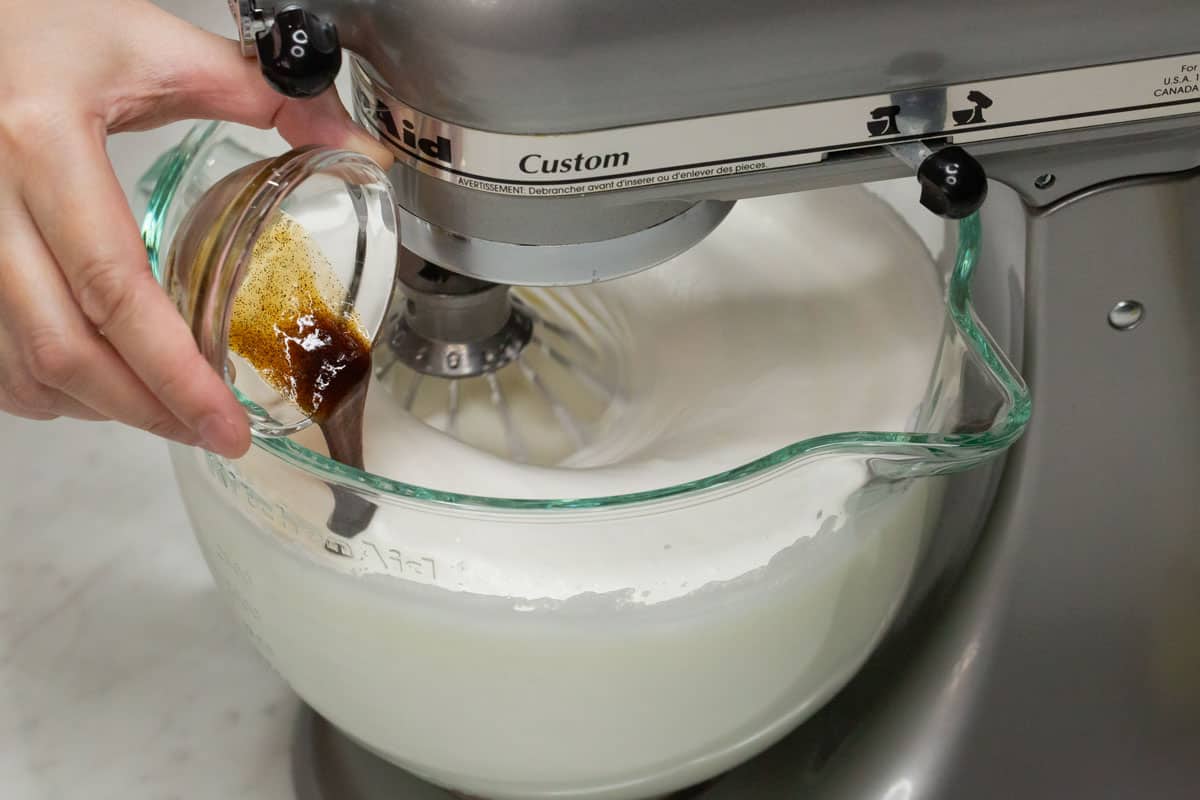
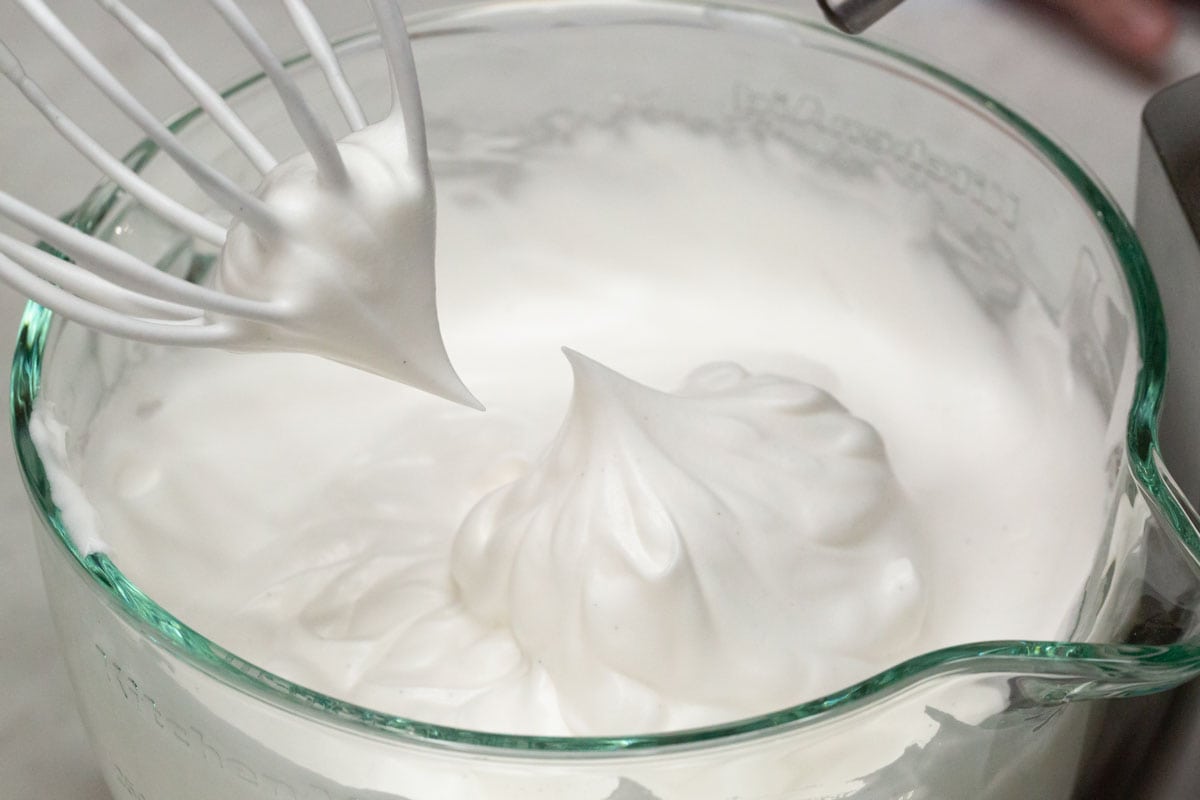
Keep beating on medium-high speed until stiff peaks form. The meringue should look glossy and hold its shape when you lift the beaters.
Do not overbeat, or it can turn grainy and harder to spread.
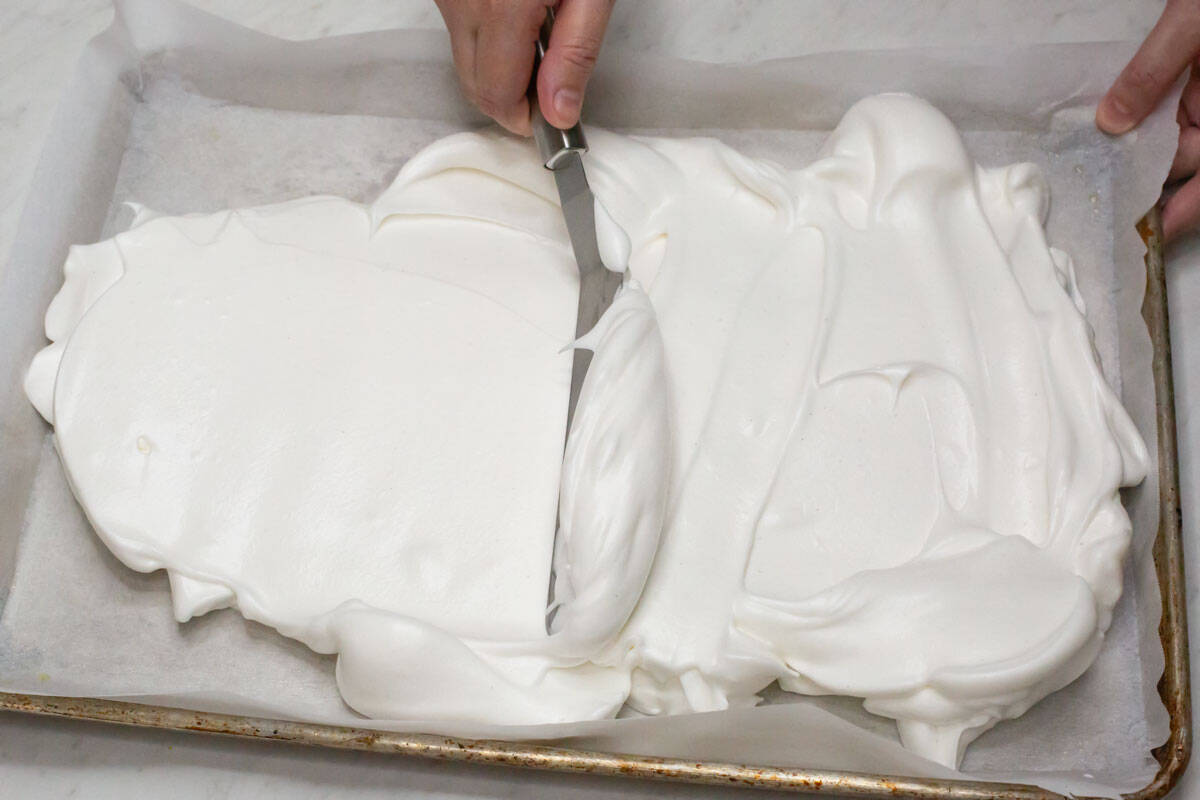
Step 5: Spread the meringue
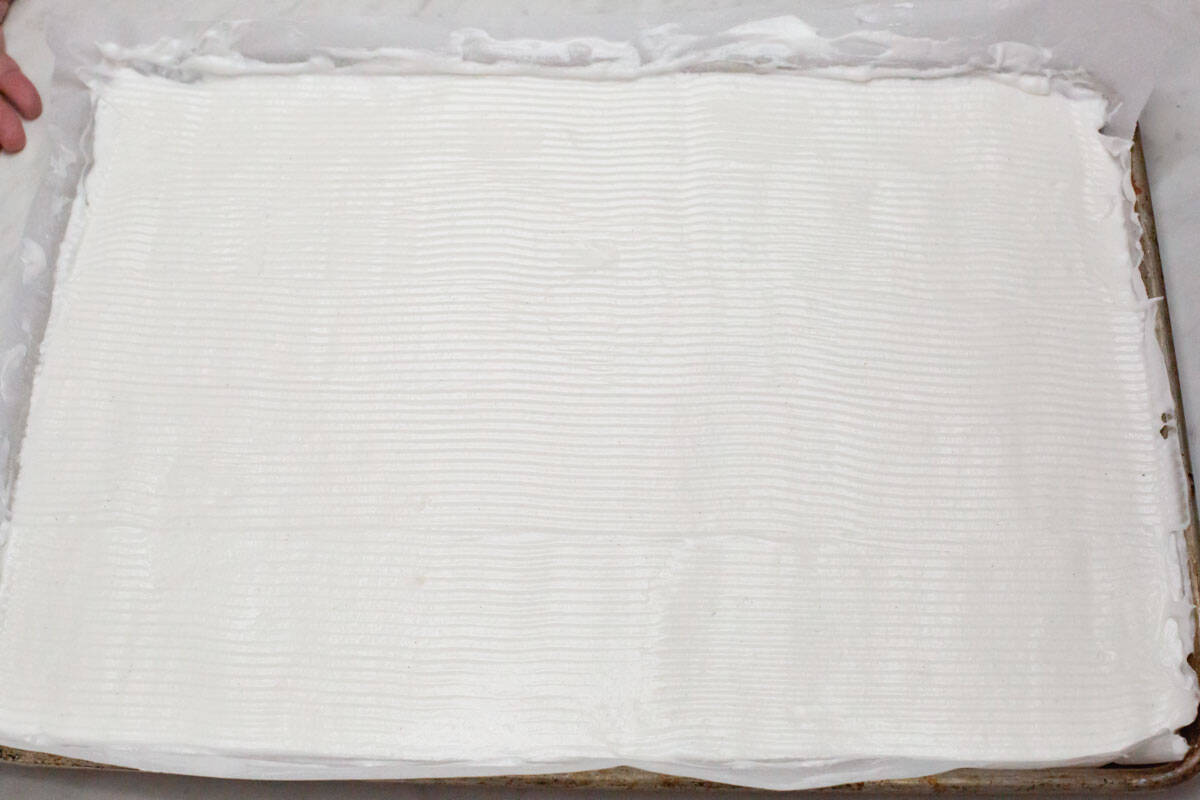
Transfer the meringue to the prepared baking sheet and spread it into an even layer using an offset spatula or the back of a spoon.
Try to keep the thickness even so it bakes evenly.
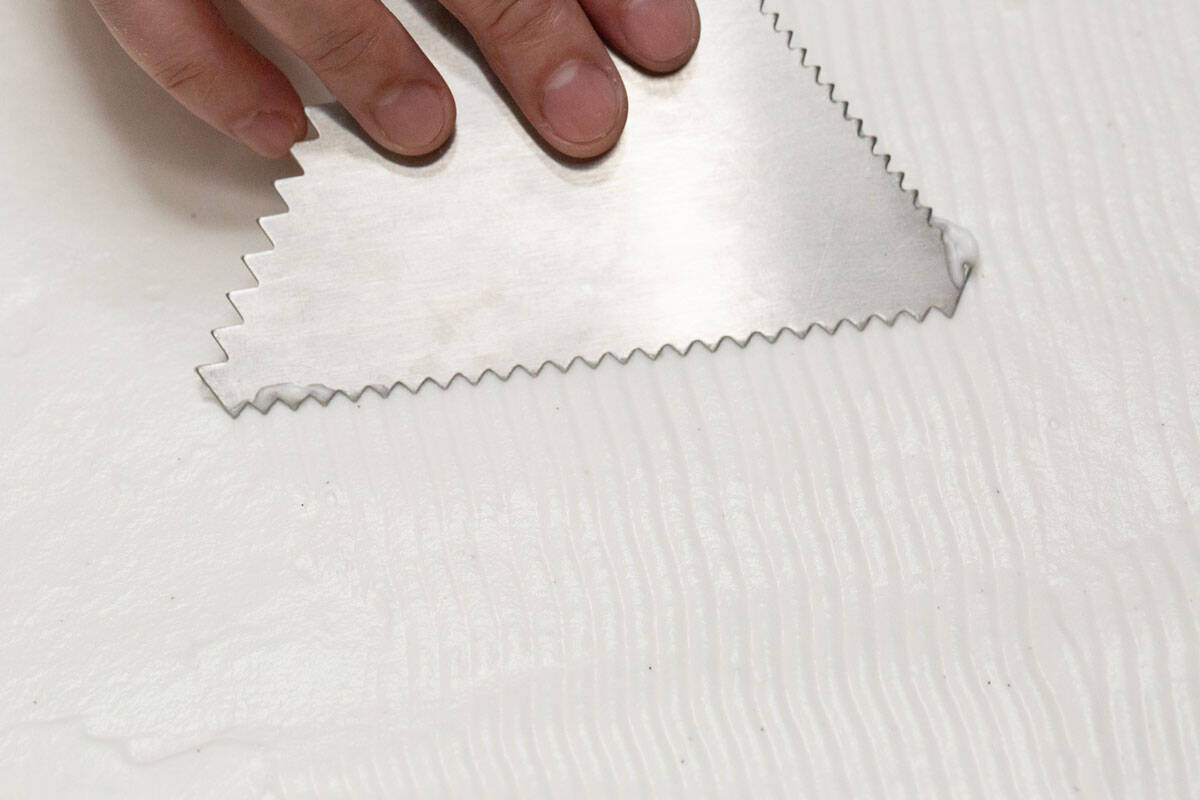
If you like, you can run a fork or pastry comb across the top to make light ridges. It's optional though - a smooth top works just as well.
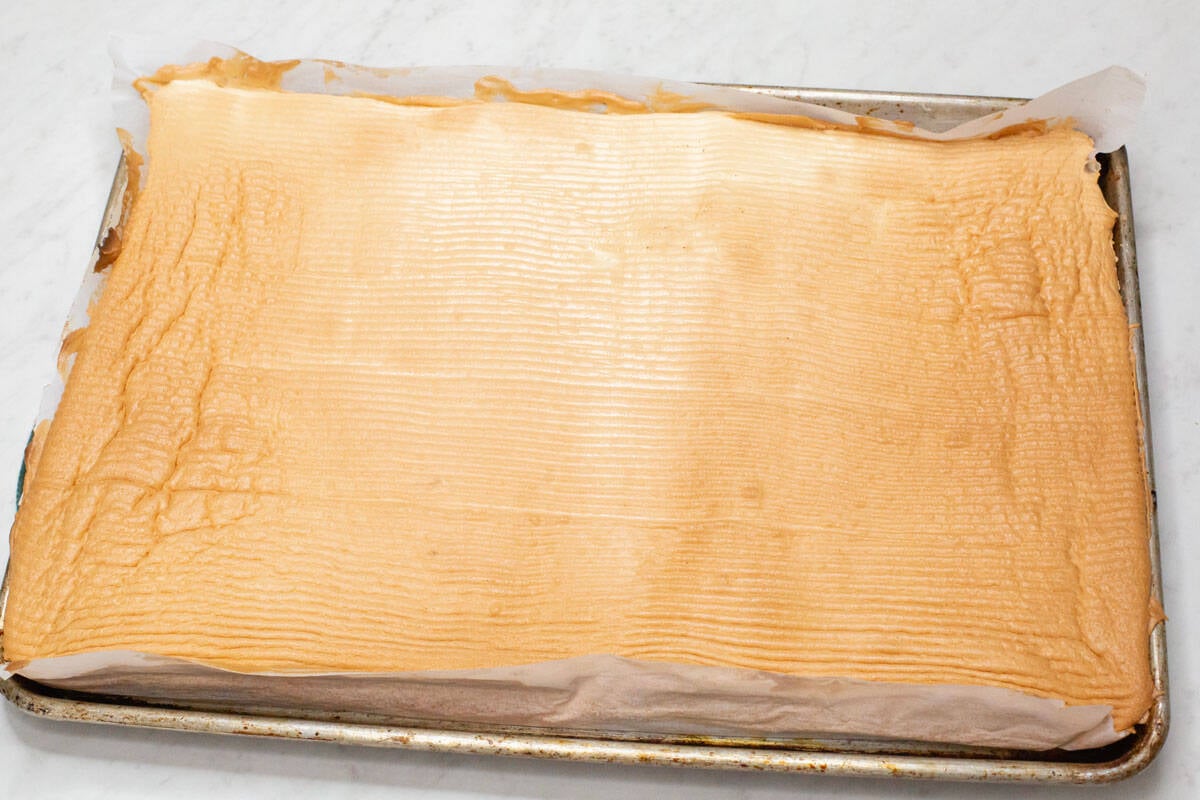
Step 6: Bake the meringue
Bake at 350°F (175°C) for 20 to 25 minutes, or until the top is lightly golden.
Turn off the oven and leave the meringue inside with the door slightly open for about 10 minutes.
This helps it cool more gently and lowers the chance of cracking or collapsing.
Step 7: Roll the meringue
Once the meringue is cool enough to handle, but still warm, sprinkle a generous amount of powdered sugar on top to help prevent sticking.
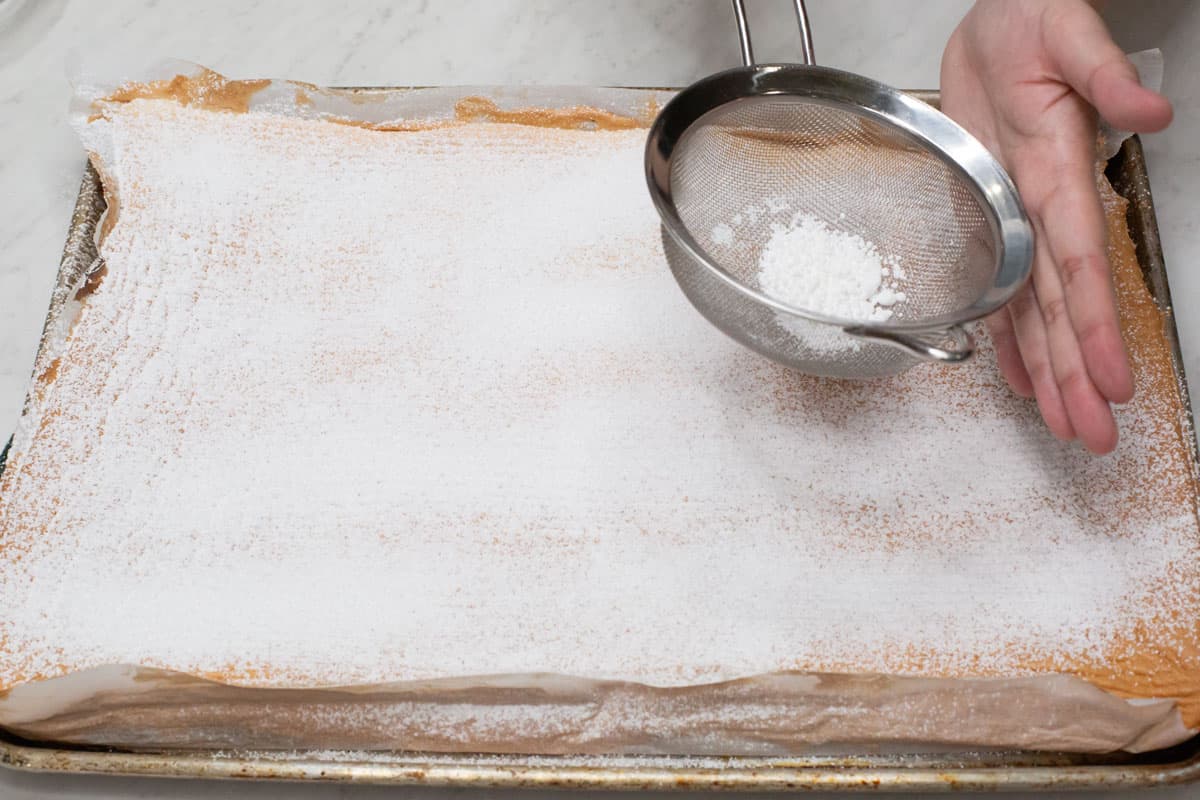
Place a new sheet of parchment paper, the same size, on top of the meringue.
Gently flip it over using another baking sheet, a cutting board, or your hands for support. Then carefully peel off the parchment it baked on.
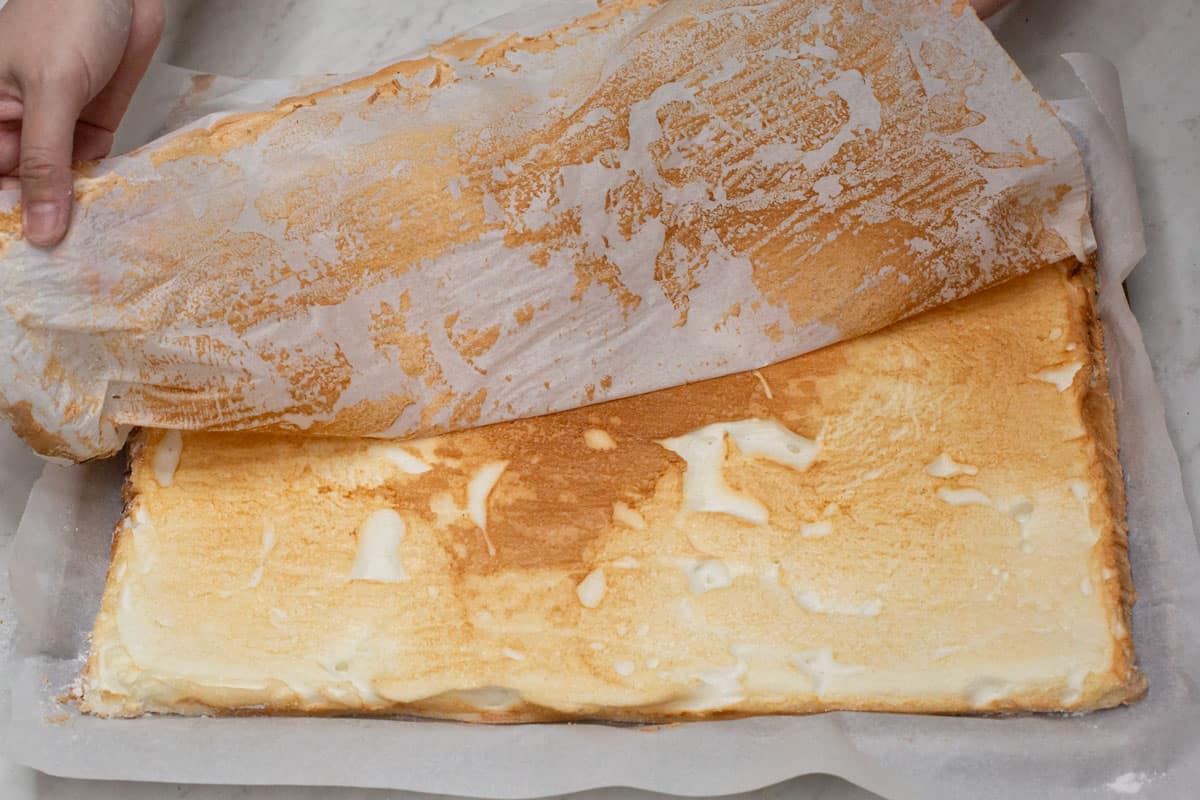
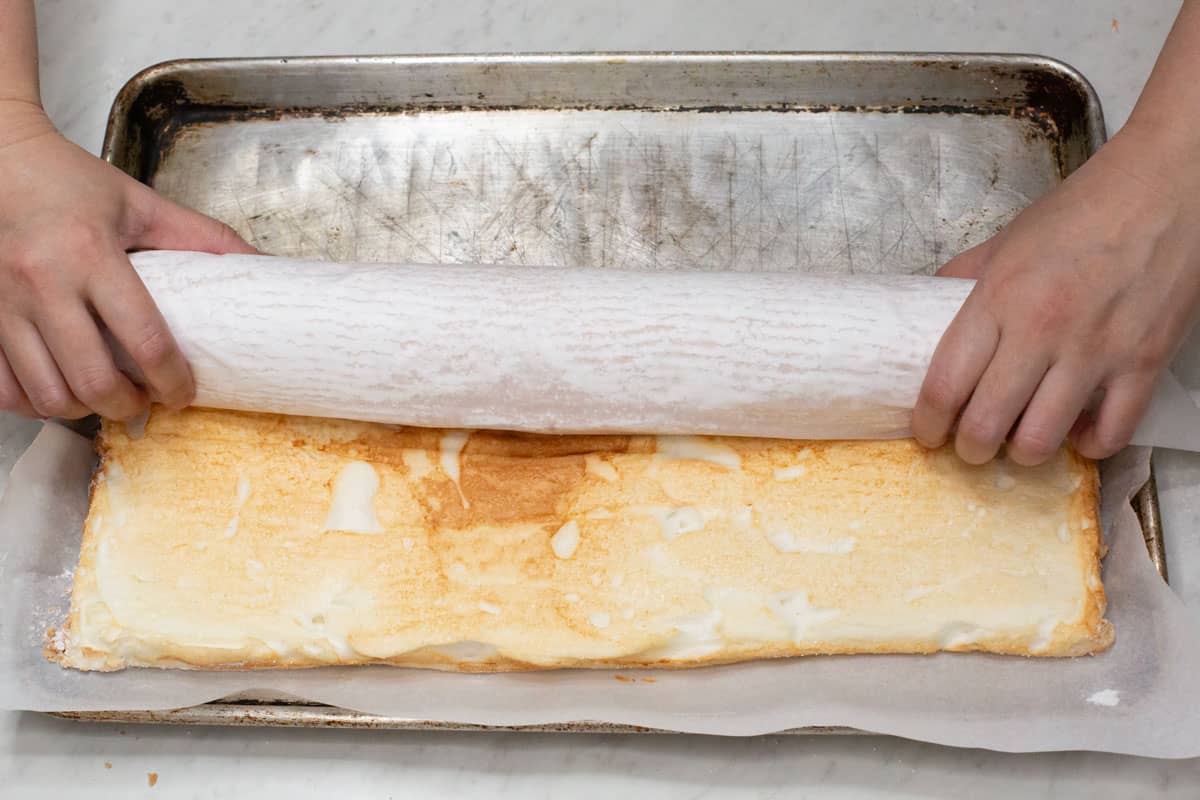
Starting from the long side, roll the meringue using the new parchment to help guide it.
Then unroll it while still warm and let it cool flat. This helps prevent cracks when you roll it again later with the filling.
Step 8: Fill the meringue
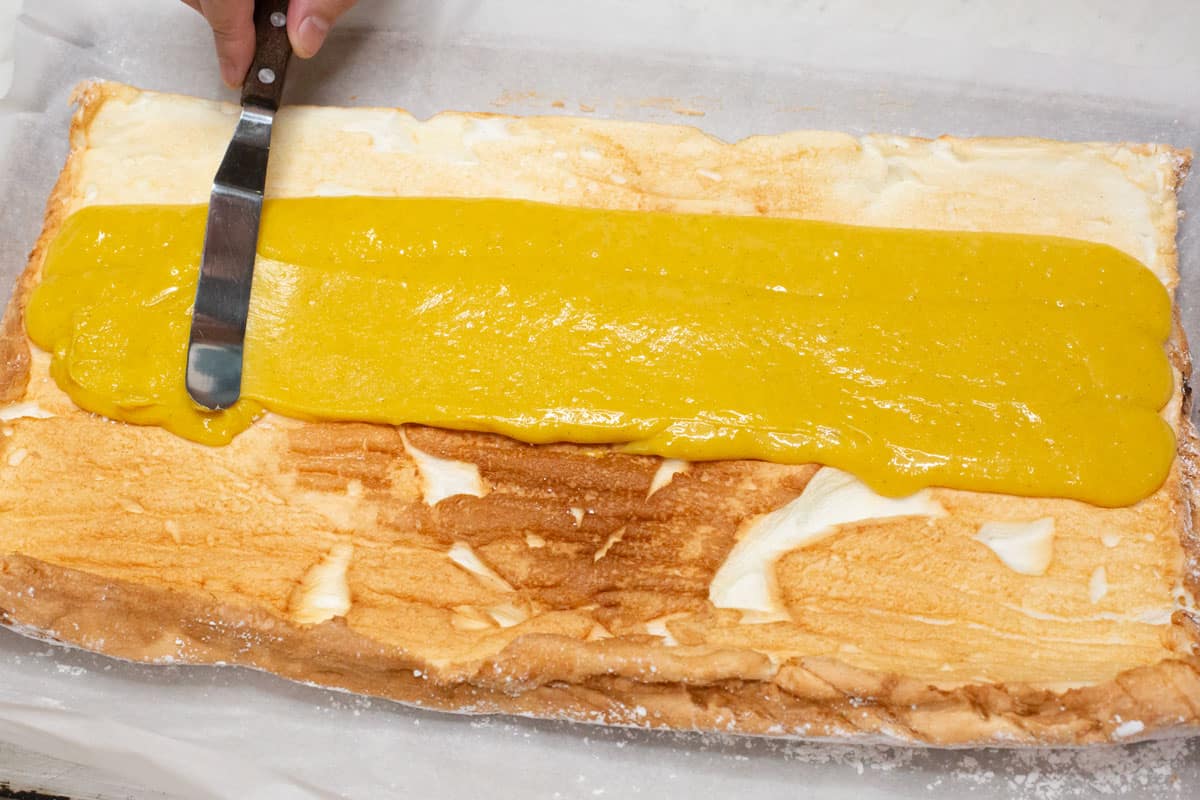
Give the cooled custard a quick stir to smooth it out.
Spread the custard over just half of the meringue, starting from one long edge and leaving about a 1-inch border at that edge.
This helps seal the roll and keeps the filling from spilling out.
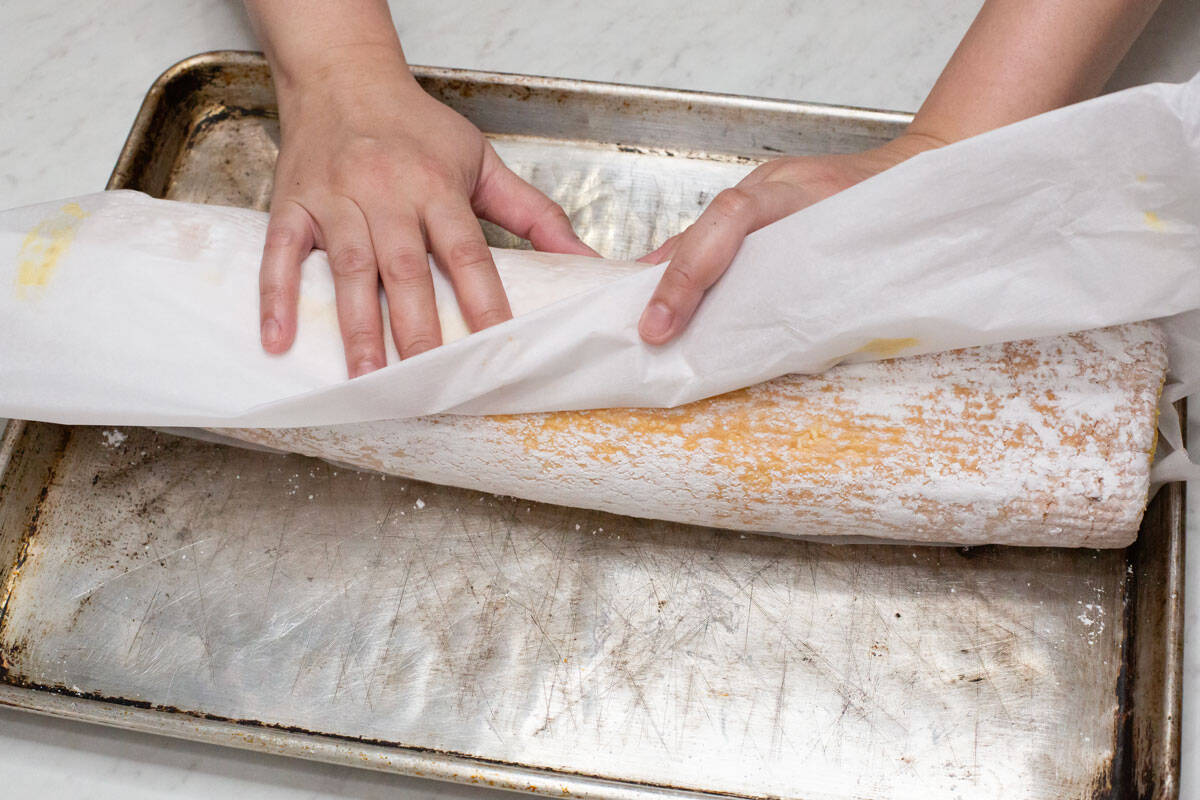
Roll the meringue into a log, starting from the filled side. Use the parchment to help lift and guide it. A few small cracks are fine.
If you like, trim the ends for a cleaner look. Place the roll seam-side down on your serving plate.
Step 9: Serve
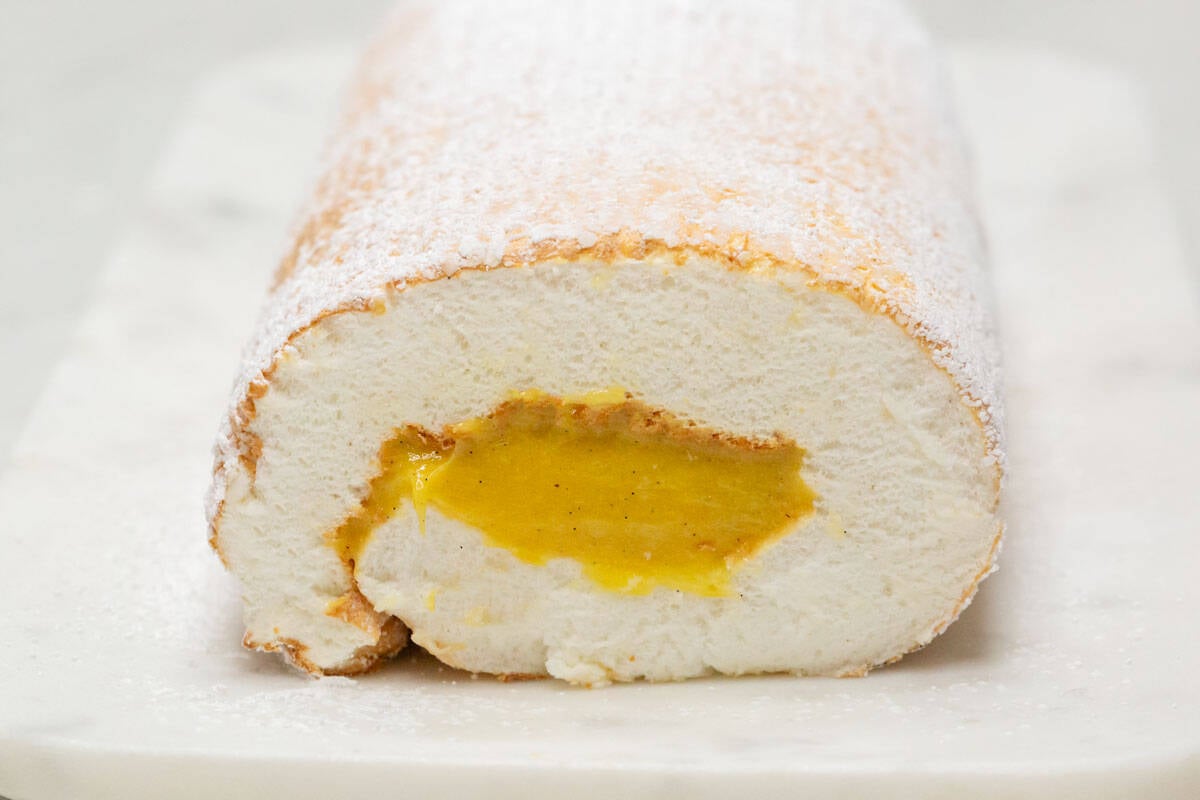
Dust the top with powdered sugar, if you like. It helps cover any cracks and gives it a nice finish.
Chill for at least an hour to help the filling set and make slicing easier.
Tips for Making Brazo de Mercedes
- Make sure no yolk gets into the egg whites, or they may not whip properly.
- Cook the custard until it falls back in a thick ribbon. It will thicken more as it cools.
- Beat the meringue until stiff peaks form, but do not overbeat or it can turn grainy.
- Spread the meringue as evenly as you can so it bakes evenly.
- Roll the meringue while it is still warm, then unroll it. This helps keep it from cracking later.
- Chill before slicing so the filling has time to set.
How to Store and Serve
- Chill for at least 1 hour before slicing for cleaner pieces.
- Store leftovers in an airtight container in the fridge for up to 2 to 3 days.
- Serve cold or slightly chilled.
- Freezing is not ideal because the meringue can get watery and the filling can lose its texture.
Recipe FAQs
A few small cracks are normal. To help prevent bigger cracks, do not overbake the meringue and roll it while it is still warm.
Meringue can turn watery if the egg whites are not whipped properly, if any yolk gets in, or if it is underbaked.
Humidity can also make it weep. Cornstarch and cream of tartar help keep it stable.
Bake until dry to the touch, then cool it in the oven with the door slightly open.
Use room-temperature egg whites with cream of tartar, beat to stiff peaks, and add the sugar gradually.
Do not overbeat, or the meringue can turn dry and grainy.
It may need more time to cook and thicken. Stir over low heat until it coats the back of a spoon. The custard will also thicken more as it cools.
It's best not to freeze it. The meringue can turn watery and lose its texture, and the custard may become grainy when you thaw it.
Yes, but it's best within 1 to 2 days. Keep it in the fridge and cover well so it doesn't dry out or turn watery.
More Desserts with Custard or Meringue
- Leche flan: Smooth caramel custard made with egg yolks and milk.
- Cassava cake: Baked cassava dessert with coconut milk and condensed milk.
- Yema cake: Soft sponge cake layered with sweet yema custard.
- Sylvanas: Frozen meringue sandwiches with buttercream and cookie crumbs.
- Sans rival: Cashew meringue layered with buttercream.
- Crema de fruta: A layered dessert with sponge cake, custard, fruit, and gelatin on top.
Cakes and Baked Desserts You May Like


Did you make this recipe? I would love to know! Your feedback helps me make better recipes. Please rate, review, or comment below. Questions about this recipe are welcome, too!
Let's connect on Facebook, Instagram, Pinterest, TikTok, Twitter, and Youtube. Be sure to tag me when you try any of my recipes @recipesbynora!
📖 Recipe
Brazo de Mercedes Recipe (Meringue Roll with Custard)
Equipment
- Mixer
- Half sheet pan (18x13 inches) or a jelly roll pan (15x10 inches)
- Parchment paper
- Double boiler (or a heatproof bowl over a pot)
- Fine mesh sieve or strainer
Ingredients
For the meringue
- 12 egg whites room temperature
- 1 teaspoon cream of tartar
- ¾ cup granulated sugar
- 1 teaspoon vanilla extract or vanilla bean paste
- 2 tablespoons cornstarch
- ¼ cup powdered sugar for dusting
- Baking spray
For the custard filling
- 12 egg yolks
- 1 cup condensed milk more to taste
- 2 tablespoons cornstarch
- 1 teaspoon vanilla extract
- A pinch of salt
- Zest of 1 lemon sub: lime or dayap
- 1 tablespoon fresh lemon juice sub: lime juice
Instructions
- Preheat oven to 350°F (175°C). Line a baking sheet with parchment paper, leaving some overhang on the sides. Lightly grease the paper.
- Separate 12 eggs. Place the whites in a large, clean mixing bowl and the yolks in a medium heatproof bowl.
- In the heatproof bowl, whisk together the 12 egg yolks, 1 cup condensed milk, 2 tablespoons cornstarch, 1 teaspoon vanilla, a pinch of salt, lemon zest, and 1 tablespoon lemon juice. Set over simmering water.
- Cook, stirring often, until thickened. It's ready when it falls in a thick ribbon. Stir in 2 tablespoons butter until melted and smooth. Let cool.
- Whip the egg whites on medium-low until foamy. Add 1 teaspoon cream of tartar. Increase to medium-high and gradually add ¾ cup sugar. Add 1 teaspoon vanilla and 2 tablespoons cornstarch. Beat until stiff, glossy peaks form.
- Spread the meringue evenly on the prepared baking sheet. Bake for 20 to 25 minutes, until lightly golden. Turn off the oven, leave the door slightly open, and let it rest inside for 10 minutes.
- Dust the top with powdered sugar. Place a new sheet of parchment on top, then gently flip onto a flat surface. Peel off the original parchment.
- With the new parchment still attached, roll the meringue from the long side, then unroll and let it cool flat.
- Spread the custard over half of the meringue, leaving about a 1-inch gap at the edge. Roll it up from the filled side, using the parchment to help guide it.
- Place seam-side down on a serving plate. Dust with powdered sugar, if you like. Chill for 1 hour before slicing.
Notes
- Eggs: Separate while cold, then let the whites come to room temperature for better volume.
- Cream of tartar: Helps keep the meringue stable. Lemon juice or white vinegar also work.
- Cornstarch: Helps keep the meringue stable and thickens the custard.
- Butter: Makes the custard smoother, but you can leave it out.
- Keep yolk out of the egg whites.
- Cook the custard until thick and smooth.
- Beat the meringue to stiff peaks, but do not overbeat.
- Spread the meringue evenly.
- Roll while still warm, then unroll it.
- Chill before slicing.
- Chill before slicing.
- Store in the fridge for 2 to 3 days.
- Serve cold or slightly chilled.
- Do not freeze if possible.


Sweet says
You mAde it look so easy..
Nora Reyes says
Hi Sweet, It actually is easy, just need a little bit of patience..I hope you give it a try. =)